
Code பயன்படுத்துவதற்கு முன்: இது கற்றல் குறிப்பு; machine-ready program அல்ல. சரியான controller manual, setup, tools, offsets ஆகியவற்றை சரிபார்த்து simulate செய்து supervised prove-out செய்யவும்.
Cycle தேர்வு செய்து ஒவ்வொரு நகர்வையும் புரிந்துகொள்ளுங்கள்.
ஒவ்வொரு பாடத்திலும் சொந்த toolpath படம், நகர்வு வரிசை, parameter விளக்கம், கணக்கு உதாரணம் மற்றும் machine-இல் கவனிக்க வேண்டியவை உள்ளன. வேறு version குறிப்பிடாத இடங்களில் Haas control விதிகள் பயன்படுத்தப்படுகின்றன. இவை எல்லா FANUC அல்லது Siemens control-க்கும் பொதுவான syntax அல்ல.
பொருத்தமான பாடம் இல்லை. G71 போன்ற code தேடவும் அல்லது search அழிக்கவும்.
பாடம் 01 / TURNING
G70 · Roughing முடிந்தபின் profile finishing
Haas lathe · இந்த control-க்கான கற்றல் விளக்கம்
G70 ஏற்கனவே வரையறுத்த இறுதி contour-ஐப் பின்பற்றும். G71, G72 அல்லது G73 roughing-க்குப் பின் விடப்பட்ட finishing allowance-ஐ அகற்றப் பயன்படும். புதிய வடிவத்தையோ allowance-ஐயோ தானாகத் தேர்வு செய்யாது. தனி finishing tool பயன்படுத்தலாம்.
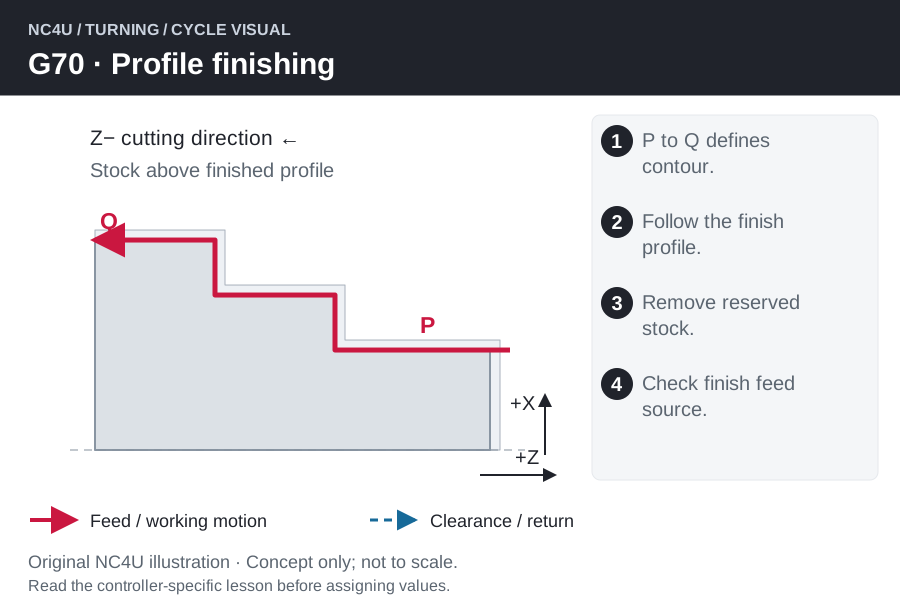
Cycle இயங்கும் முறை
- Finishing tool-ஐ clear start point-இல் வைத்து offset மற்றும் nose geometry பார்க்கவும்.
- இறுதி profile உள்ள P முதல் Q block range-ஐ அழைக்கவும்.
- அந்த range-இன் effective feed, speed, tool commands உடன் contour-ஐப் பின்பற்றும்.
- Q முடிந்தபின் saved start-க்கு rapid return; பின்னர் G70-க்கு அடுத்த block தொடரும்.
Program words விளக்கம்
| Word | பொருள் |
|---|---|
P | முதல் contour block எண்; coordinate அல்ல. |
Q | கடைசி contour block எண்; இதுவும் வெட்டப்படும். |
F / S / T | Contour range-க்குள் உள்ள commands finishing-இல் செயல்படும். |
Cycle format-ஐப் படியுங்கள்
இது placeholders கொண்ட syntax விளக்கம்; இயக்கக்கூடிய முழு program அல்ல.
G70 P[first-block] Q[last-block]புரிந்துகொள்ள ஒரு உதாரணம்
40.0 mm தேவைப்படும் OD, roughing முடிவில் 40.4 mm இருந்தால் finishing tool radius-இல் 0.2 mm அகற்றும். எல்லா shoulder-களிலும் மீதமுள்ள stock ஒரே அளவா என்பதைப் பார்க்கவும்.
பொதுவான தவறுகள் மற்றும் setup சோதனைகள்
- Return path-இல் shoulder, jaw, stock குறுக்கிடக்கூடாது.
- Drawing size மற்றும் finish-ஐ அளந்து உறுதி செய்யவும்; G70 inspection அல்ல.
G71 நீளவாட்டு pass-களில் stock அகற்றும்; G70 இறுதி contour-ஐப் பின்பற்றும். சில Haas contour subprogram வசதிகள் FANUC-க்கு பொருந்தாது.
பாடம் 02 / TURNING
G71 · நீளவாட்டு stock removal
Haas lathe · இந்த control-க்கான கற்றல் விளக்கம்
G71 பொதுவாக Z-க்கு இணையான pass-களால் OD அல்லது ID profile roughing செய்யும். இறுதி contour-ஐ ஒருமுறை கொடுத்தால் control roughing pass-களை அமைத்து finishing stock விடும். படம் OD உதாரணம்; எல்லா tool direction-க்கும் இதே path அல்ல.
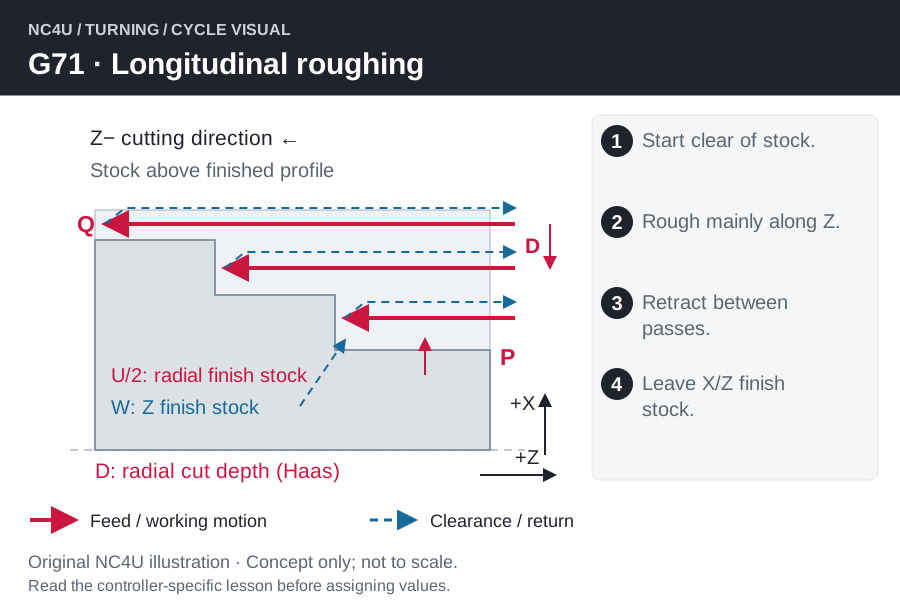
Cycle இயங்கும் முறை
- Stock-க்கு வெளியே clear start அமைத்து XZ plane-இல் P–Q contour வரையறுக்கவும்.
- அடுத்த depth-க்கு உள்ளே நகர்ந்து Z திசையில் contour வரை வெட்டும்.
- Clear retract செய்து அடுத்த pass-க்கு starting Z clearance நோக்கித் திரும்பும்.
- குறிப்பிட்ட allowance-உடன் roughing முடியும்; பின்னர் பொருத்தமான finishing செய்யவும்.
Program words விளக்கம்
| Word | பொருள் |
|---|---|
P / Q | இறுதி contour-ன் முதல் / கடைசி block. |
D | One-block format: radial roughing depth. |
U / W | Finish stock: U என்பது X diameter allowance; W என்பது Z allowance. |
I / K | விருப்ப rough-pass allowance: I radius; K Z திசை. |
F | Lathe G98/G99 அடிப்படையில் roughing feed. |
Cycle format-ஐப் படியுங்கள்
இது placeholders கொண்ட syntax விளக்கம்; இயக்கக்கூடிய முழு program அல்ல.
G71 P[first] Q[last] D[radial-cut] U[diameter-stock] W[Z-stock] F[feed]புரிந்துகொள்ள ஒரு உதாரணம்
50 mm blank-ஐ 46 mm ஆக்க radius-இல் 2 mm அகற்ற வேண்டும். 1 mm radial step diameter-ஐ 2 mm மாற்றும். Finish allowance இடத்தில் U0.4 கொடுத்தால் radius-இல் 0.2 mm விடும்; அது 0.4 mm cut அல்ல.
மாற்று format-ஐ கவனமாகப் படியுங்கள்
Haas NGC 2017 manual-இல் உள்ள two-block வடிவம்: முதல் G71 வரியில் U என்பது ஒவ்வொரு pass radial depth; R என்பது retract அளவு. இரண்டாவது G71 வரியில் U என்பது diameter finishing allowance; P/Q contour blocks, W axial allowance, F feed ஆகியவையும் வரும். ஆகவே முதல் U1.0 என்பது 1.0 mm radial cut; இரண்டாவது U0.2 என்பது 0.1 mm radial finish stock. R1.0 work-coordinate R plane அல்ல. இது கொடுத்த two-line உதாரணத்தின் வாசிப்பு; எல்லா FANUC-க்கும் பொதுவான program அல்ல.
G71 U[radial-cut] R[retract]
G71 P[first] Q[last] U[diameter-stock] W[Z-stock] F[feed]
பொதுவான தவறுகள் மற்றும் setup சோதனைகள்
- Haas Type I contour-இல் X reversal இல்லை; Type II-இல் அனுமதி உண்டு. இரண்டிலும் Z reverse ஆகக்கூடாது.
- Two-block U/R setup-ஐ one-block D பொருளுடன் கலக்க வேண்டாம். Start, allowance sign, tool access சரிபார்க்கவும்.
G72 face-க்கு குறுக்காக வெட்டும். G73 offset contour-களை மீண்டும் பின்பற்றும். நீளவாட்டு roughing பொருந்தும் blank/profile-க்கு G71.
பாடம் 03 / TURNING
G72 · Face stock removal
Haas lathe · இந்த control-க்கான கற்றல் விளக்கம்
G72 பெரும்பாலும் X திசை pass-களால் face profile roughing செய்யும். Shaft நீளத்தில் வெட்டுவதைவிட face-க்கு குறுக்கே stock அகற்ற வேண்டும்போது பயன்படும். இறுதி வடிவம் P–Q contour-இலிருந்து வரும்; finishing stock தனியாகத் திட்டமிட வேண்டும்.
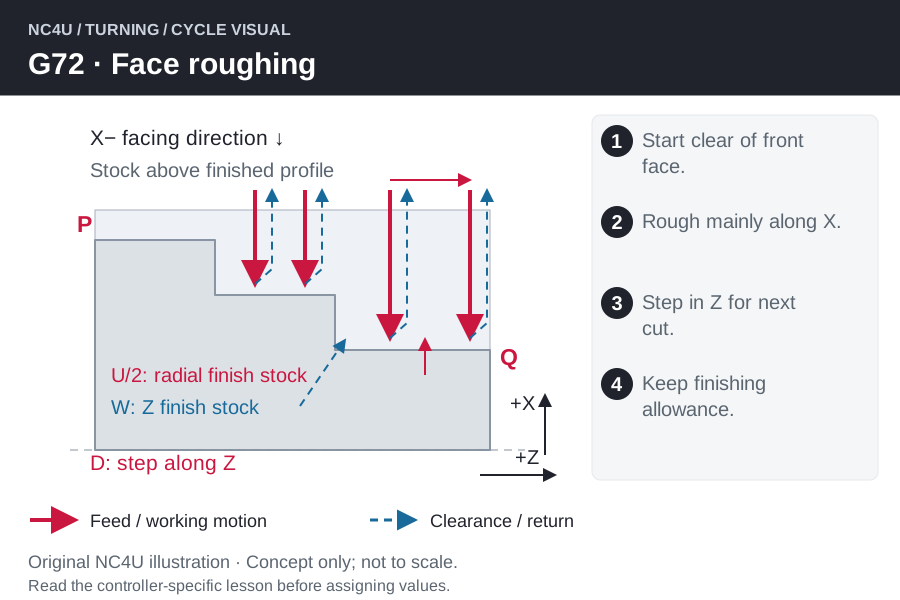
Cycle இயங்கும் முறை
- Blank face-க்கு வெளியே clear start அமைக்கவும்.
- அடுத்த Z cutting level-க்கு சென்று X திசையில் face வெட்டும்.
- Retract செய்து அடுத்த pass-க்கு clearance-க்கு திரும்பும்.
- U/W finish stock விட்டு rough contour பின்பற்றி saved start-க்கு திரும்பும்.
Program words விளக்கம்
| Word | பொருள் |
|---|---|
P / Q | Contour block எல்லைகள். |
D | One-block G72 cut depth; face pass-களின் இடைவெளி. |
U / W | X finish allowance diameter அளவு; Z allowance axial. |
F | செயலிலுள்ள lathe feed mode-க்கு ஏற்ப rough feed. |
Cycle format-ஐப் படியுங்கள்
இது placeholders கொண்ட syntax விளக்கம்; இயக்கக்கூடிய முழு program அல்ல.
G72 P[first] Q[last] D[cut-depth] U[diameter-stock] W[Z-stock] F[feed]புரிந்துகொள்ள ஒரு உதாரணம்
Face-இல் Z திசையில் 3 mm excess இருந்தால் அதை layers ஆகக் கருதுங்கள். 1 mm rough step என்றால் ஒவ்வொரு layer-மும் Z-இல் 1 mm உள்ளே இருக்கும். கடைசி rough layer-இல் finishing stock விட வேண்டும்.
பொதுவான தவறுகள் மற்றும் setup சோதனைகள்
- முழு X travel மற்றும் centre approach-க்கு insert geometry பொருந்த வேண்டும்.
- Type I/II contour விதி மற்றும் P-block விதியை தனியாகச் சரிபார்க்கவும்; G71 போலவே என்று ஊகிக்க வேண்டாம்.
G71 Z திசை rough pass; G72 X திசை face pass. G94 எளிய facing loop; அடுத்த depth-களை programmer கொடுக்க வேண்டும்.
பாடம் 04 / TURNING
G73 · Contour மீண்டும் பின்பற்றும் roughing
Haas lathe · இந்த control-க்கான கற்றல் விளக்கம்
Lathe G73 இறுதி profile-ன் shifted வடிவங்களை மீண்டும் வெட்டும். Component வடிவத்தை ஒத்த casting அல்லது forging-க்கு பொருந்தலாம். Stock வடிவம் தெரிந்திருக்க வேண்டும்; தெரியாத stock-ஐ தானாகத் தவிர்க்காது.
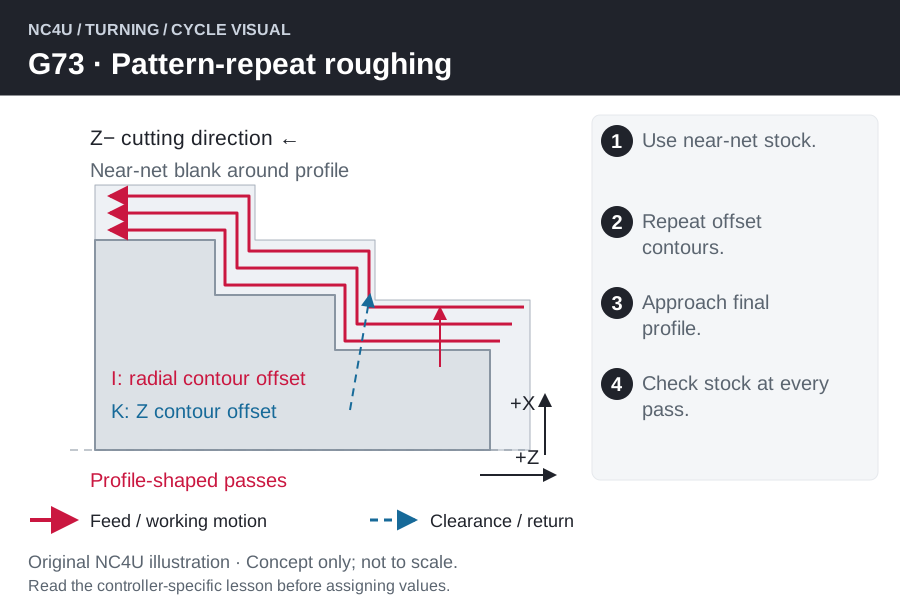
Cycle இயங்கும் முறை
- இறுதி P–Q profile அமைத்து preform stock offset அளக்கவும்.
- P block movement-க்கு ஏற்ப முதல் shifted contour-ஐ அணுகும்.
- Contour வெட்டி clear departure செய்து இறுதி வடிவத்திற்கு அருகில் மீண்டும் வெட்டும்.
- Pass count முடிந்தபின் U/W stock விட்டு start-க்கு திரும்பும்.
Program words விளக்கம்
| Word | பொருள் |
|---|---|
D | முழு எண் contour pass count; cut depth அல்ல. |
I / K | முதல் முதல் கடைசி rough contour shift: I radial X; K Z. |
U / W | கடைசி roughing-இல் radius U/2, Z-இல் W விடப்படும். |
P / Q | மீண்டும் செய்யும் contour தொடக்கம்/முடிவு. |
Cycle format-ஐப் படியுங்கள்
இது placeholders கொண்ட syntax விளக்கம்; இயக்கக்கூடிய முழு program அல்ல.
G73 P[first] Q[last] I[radial-shift] K[Z-shift] D[pass-count] U[diameter-stock] W[Z-stock] F[feed]புரிந்துகொள்ள ஒரு உதாரணம்
I = 3 mm, D = 4 pass என்றால் contour இடையிலான radial shift 3 ÷ (4 − 1) = 1 mm. U0.4 தனியாக 0.2 mm radial finish stock விடும். இது geometry கணக்கு மட்டுமே.
பொதுவான தவறுகள் மற்றும் setup சோதனைகள்
- உண்மையான casting stock-இல் approach/departure மோதலில்லையா பார்க்கவும்.
- Lathe G73-ஐ milling chip-break drilling உடன் குழப்ப வேண்டாம்.
இறுதி drawing curved என்பதற்காக மட்டும் G73 தேர்வு செய்யாதீர்கள். Preform-க்கு offset contours பொருந்த வேண்டும்; solid bar-க்கு வேறு roughing தேவைப்படலாம்.
பாடம் 05 / TURNING
G74 · End-face peck grooving
Haas lathe · இந்த control-க்கான கற்றல் விளக்கம்
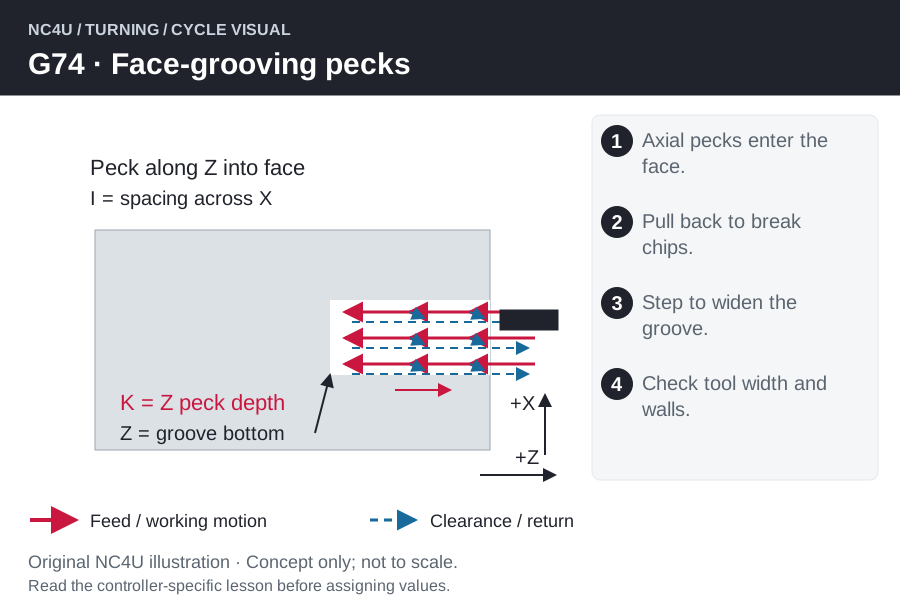
G74 பெரும்பாலும் Z திசையில் end face-க்குள் செல்லும். Face-grooving tool மூலம் annular groove செய்யலாம்; பொருத்தமான axial drill setup-இல் peck drilling-க்கும் பயன்படுத்தலாம். Groove width, tool clearance-ஐ cycle தானாக அறியாது.
Cycle இயங்கும் முறை
- முதல் radial location-இல் face-க்கு வெளியே tool வைக்கவும்.
- K அளவு Z peck செய்து configured chip-relief retract செய்யும்.
- இறுதி Z வரை தொடர்ந்தபின் clear return செய்யும்.
- கூடுதல் X positions இருந்தால் I step செய்து peck sequence மீண்டும் நடக்கும்.
Program words விளக்கம்
| Word | பொருள் |
|---|---|
Z / W | இறுதி axial depth: absolute Z அல்லது incremental W. |
K | ஒவ்வொரு peck-ன் Z depth increment. |
X / I | X இறுதி diameter location; I என்பது peck position diameter spacing. |
D | விருப்ப radial clearance shift; closed groove wall-இல் மோதலாம். |
Cycle format-ஐப் படியுங்கள்
இது placeholders கொண்ட syntax விளக்கம்; இயக்கக்கூடிய முழு program அல்ல.
G74 Z[depth] K[axial-peck] F[feed]புரிந்துகொள்ள ஒரு உதாரணம்
6 mm face groove-க்கு மூன்று 2 mm axial advance-களாக முதலில் வரைந்து பாருங்கள். I மூலம் diameter 2 mm மாறினால் radial spacing 1 mm மட்டுமே. Insert width-உடன் இதை ஒப்பிட்டு overlap புரிந்துகொள்ளவும்.
பொதுவான தவறுகள் மற்றும் setup சோதனைகள்
- Face groove diameter range-க்கு holder பொருந்த வேண்டும்.
- இருபக்கமும் wall உள்ள groove-இல் D shift சேர்க்க வேண்டாம்; tool உடையலாம்.
- Version கவனம்: தற்போதைய Haas web reference-இல் I diameter spacing; சில பழைய manuals-இல் வேறு பொருள் உள்ளது. Machine software-க்கு பொருந்தும் manual-ஐ உறுதி செய்யவும்.
G75 OD/ID groove-க்கு radial peck; G74 face-க்கு axial peck. I/K பொருள்களும் அதற்கேற்ப மாறும்.
பாடம் 06 / TURNING
G75 · OD/ID radial peck grooving
Haas lathe · இந்த control-க்கான கற்றல் விளக்கம்
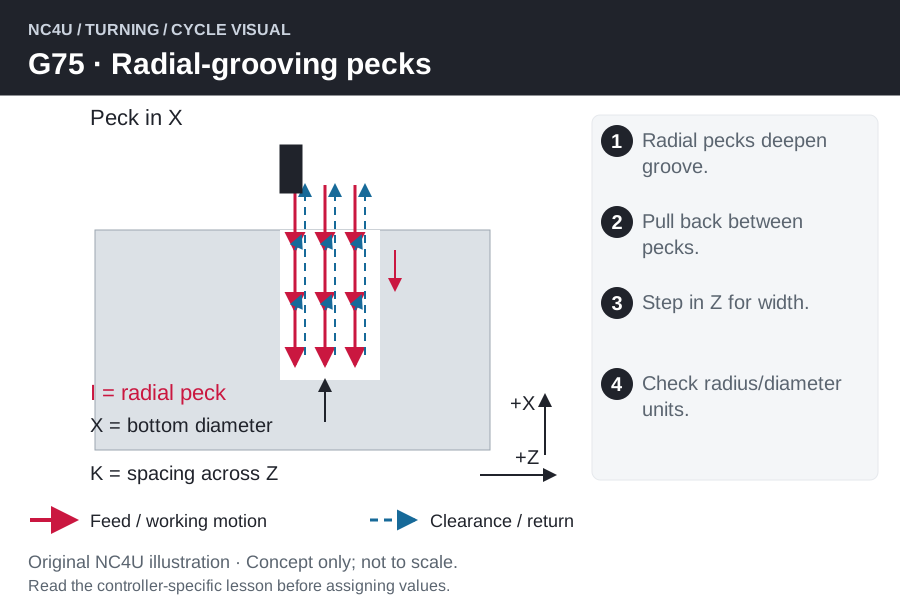
G75 X திசையில் groove-க்குள் feed செய்து peck இடையில் relief வழங்கும். கூடுதல் Z position-களிலும் மீண்டும் செய்யலாம். Wide groove-க்கு insert width, side-cutting capability, chip space ஆகியவை பொருந்த வேண்டும்.
Cycle இயங்கும் முறை
- Groove Z position-இல் clear starting diameter அமைக்கவும்.
- Target X நோக்கி radial peck செய்து cuts இடையில் relief செய்யும்.
- Radial depth முடிந்ததும் groove-க்கு வெளியே திரும்பும்.
- Z/K இருந்தால் அடுத்த axial station-க்கு சென்று மீண்டும் செய்யும்.
Program words விளக்கம்
| Word | பொருள் |
|---|---|
X / U | இறுதி groove-bottom diameter அல்லது incremental diameter change. |
I | Radial peck depth; diameter peck value அல்ல. |
Z / K | கடைசி axial position மற்றும் groove station spacing. |
F | Cutting feed; lathe feed mode உறுதி செய்யவும். |
Cycle format-ஐப் படியுங்கள்
இது placeholders கொண்ட syntax விளக்கம்; இயக்கக்கூடிய முழு program அல்ல.
G75 X[bottom-diameter] I[radial-peck] F[feed]புரிந்துகொள்ள ஒரு உதாரணம்
Diameter 40 முதல் 34 வரை groove என்றால் radial depth 3 mm. I = 1 mm என்ற கணக்கு உதாரணத்தில் மூன்று radial increments; ஆறு அல்ல. 2 mm insert இருந்தால் Z offset எந்த edge-ஐ குறிக்கிறது என்பதையும் கணக்கிடவும்.
பொதுவான தவறுகள் மற்றும் setup சோதனைகள்
- ID வேலைக்கு minimum clearance மற்றும் configured relief distance பார்க்கவும்.
- Cutting width-ஐவிட Z step அதிகமெனில் ribs மீதமாகலாம்; மிகக் குறைந்தால் rubbing அதிகரிக்கலாம்.
G75-இல் I radial; endpoint X diameter. Prove-out-க்கு முன் இந்த வேறுபாட்டைப் புரிந்துகொள்வது முக்கியம்.
பாடம் 07 / TURNING
G76 · பல pass thread cutting
Haas lathe · இந்த control-க்கான கற்றல் விளக்கம்
G76 பல synchronized pass-களில் thread depth அதிகரிக்கும். Thread specification lead மற்றும் geometry-ஐ நிர்ணயிக்கும்; Haas arguments/settings cuts-ஐப் பகிரும். Straight அல்லது tapered thread செய்யலாம். Cycle சரியாக இருந்தாலே fit சரியாக இருக்கும் என்று அர்த்தமில்லை.

Cycle இயங்கும் முறை
- Blank/bore, relief, thread-க்கு முன் clear start தயாரிக்கவும்.
- குறிப்பிட்ட lead-இல் spindle rotation-உடன் cut synchronize ஆகும்.
- Pull out செய்து அடுத்த deeper pass-க்கு திரும்பும்.
- Final passes முடிந்தபின் தேவையான gauge/measurement மூலம் thread பார்க்கவும்.
Program words விளக்கம்
| Word | பொருள் |
|---|---|
X / Z | Thread depth diameter மற்றும் Z end position. |
K | Thread height radial அளவு; diameter reduction அல்ல. |
D | முதல் pass cut depth. |
F | Thread lead: ஒவ்வொரு revolution axial travel. |
I / A | I radial taper amount; A tool nose angle. |
Cycle format-ஐப் படியுங்கள்
இது placeholders கொண்ட syntax விளக்கம்; இயக்கக்கூடிய முழு program அல்ல.
G76 X[depth-diameter] Z[end] K[radial-height] D[first-cut] F[lead]புரிந்துகொள்ள ஒரு உதாரணம்
1.5 mm pitch கொண்ட two-start thread lead 3.0 mm/rev; அதே pitch single-start lead 1.5 mm/rev. இவை K-ஐ நிர்ணயிக்காது; thread form, tolerance, crest/root truncation தேவை.
பொதுவான தவறுகள் மற்றும் setup சோதனைகள்
- Run-out space, finish allowance, chamfer settings-ஐ shoulder-க்கு முன் சரிபார்க்கவும்.
- Packed-P FANUC two-block parameters-ஐ Haas one-block format-இல் பயன்படுத்த வேண்டாம்.
G92-க்கு programmer pass diameters கொடுக்க வேண்டும். G32 automatic return இல்லாத synchronized move. G76 multiple-pass strategy-ஐ தானாகச் செய்கிறது.
பாடம் 08 / TURNING
G90 · எளிய longitudinal turning loop
Haas lathe · இந்த control-க்கான கற்றல் விளக்கம்
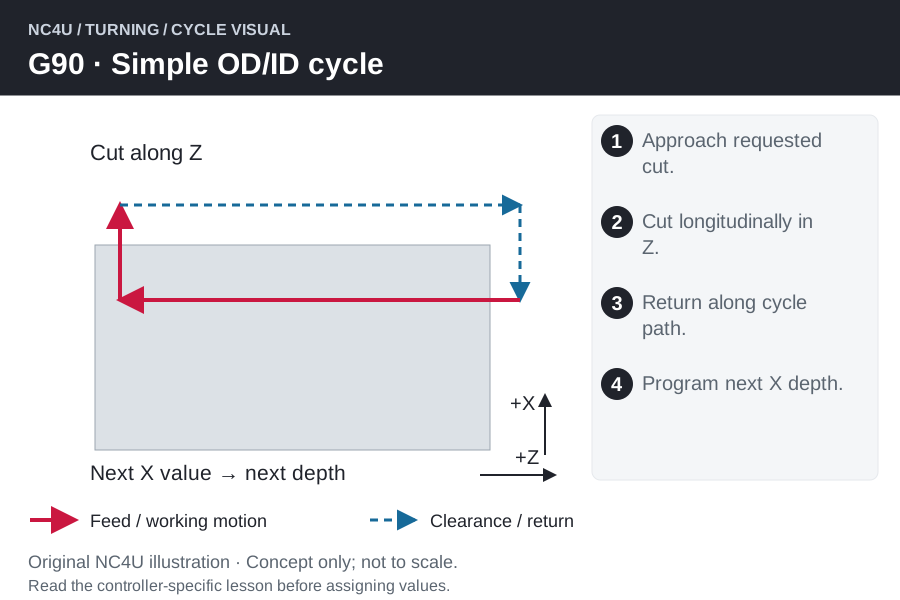
Haas lathe G90 turning cycle; mill absolute-position command அல்ல. Straight/taper cut மற்றும் return loop உருவாக்கும். அடுத்த pass diameter-களை programmer கொடுப்பதால் எளிய cylindrical பகுதியை P–Q contour இல்லாமல் செய்யலாம்.
Cycle இயங்கும் முறை
- Stock-க்கு வெளியே, end face-க்கு clear Z-இல் தொடங்கவும்.
- Cutting diameter-க்கு சென்று Z endpoint வரை feed செய்யும்.
- Cycle loop-இல் withdraw செய்து start பகுதியை அடையும்.
- G90 active-இல் அடுத்த X diameter கொடுக்கலாம்; முடிக்க வேறு motion mode தேர்வு செய்யவும்.
Program words விளக்கம்
| Word | பொருள் |
|---|---|
X / Z | Absolute cut endpoint; காட்டிய mode-இல் X diameter. |
U / W | X/Z-க்கான incremental மாற்று. |
I | விருப்ப signed radial taper அளவு. |
F | Lathe feed mode-க்கான feed. |
Cycle format-ஐப் படியுங்கள்
இது placeholders கொண்ட syntax விளக்கம்; இயக்கக்கூடிய முழு program அல்ல.
G90 X[diameter] Z[end] F[feed]புரிந்துகொள்ள ஒரு உதாரணம்
50 mm blank-இல் 48, 46, 44 mm pass diameters என்று sketch செய்யலாம். ஒவ்வொரு 2 mm diameter change-மும் 1 mm radial increment. உண்மையான plan-க்கு finish size, allowance, tool load தேவை.
பொதுவான தவறுகள் மற்றும் setup சோதனைகள்
- Loop rapid பகுதி stock/shoulder-ஐத் தாண்ட clear ஆக வேண்டும்.
- தொடர்பில்லாத coordinate block-க்கு முன் modal cycle மாற்றப்பட வேண்டும்.
G71 contour-இலிருந்து rough pass கணக்கிடும்; G90 நீங்கள் கொடுக்கும் pass endpoint-ஐப் பயன்படுத்தும்.
பாடம் 09 / TURNING
G92 · Pass diameters கொடுத்து threading
Haas lathe · இந்த control-க்கான கற்றல் விளக்கம்
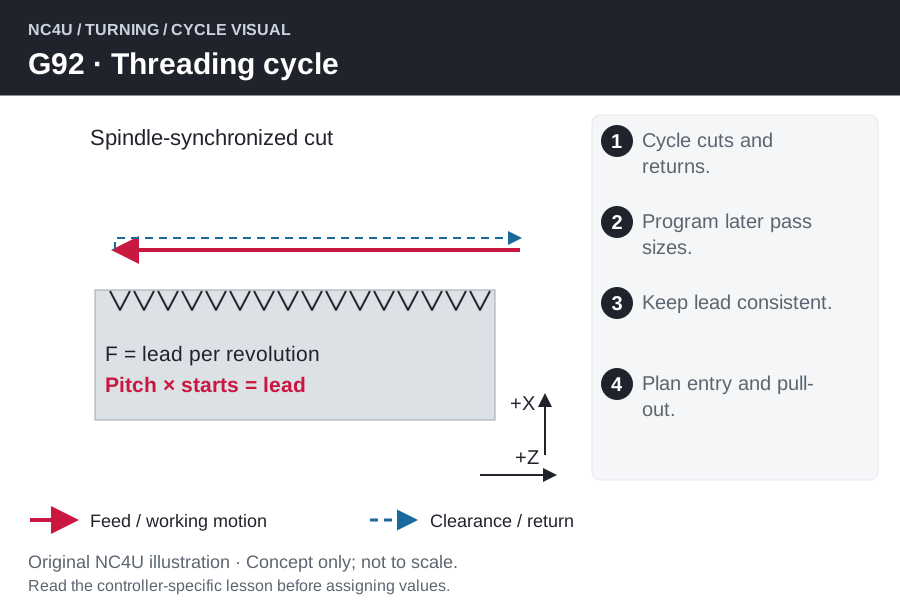
G92 thread வெட்டி cycle loop வழியாகத் திரும்பும். Thread ஆழம் அதிகரிக்க successive diameter-களை programmer கொடுப்பார். Pass schedule கட்டுப்பாடு கிடைக்கும்; infeed, consistent lead, end relief ஆகிய பொறுப்புகளும் programmer-க்கே.
Cycle இயங்கும் முறை
- Thread blank/bore மற்றும் clear synchronization approach தயாரிக்கவும்.
- X, Z, lead-க்கு ஏற்ப ஒரு threading pass செய்யும்.
- Cycle pull out செய்து start-க்கு திரும்பும்.
- அடுத்த depth diameter கொடுத்து planned geometry வரை தொடரவும்.
Program words விளக்கம்
| Word | பொருள் |
|---|---|
X / Z | அந்த pass depth diameter மற்றும் thread endpoint. |
F | Lead; விருப்பமாக மாற்றும் cutting feed அல்ல. |
I | விருப்ப radial taper அளவு. |
Q | Haas input விதியுடன் thread-start angle. |
Cycle format-ஐப் படியுங்கள்
இது placeholders கொண்ட syntax விளக்கம்; இயக்கக்கூடிய முழு program அல்ல.
G92 X[pass-diameter] Z[end] F[lead]புரிந்துகொள்ள ஒரு உதாரணம்
OD thread pass diameter 0.20 mm குறைந்தால் radial depth 0.10 mm அதிகரிக்கும். ஆழம் அதிகரிக்க flank engagement கூடும்; ஒரே diameter change என்பதால் ஒரே cutting load அல்ல.
பொதுவான தவறுகள் மற்றும் setup சோதனைகள்
- Automatic thread chamfer மற்றும் run-out space பார்க்கவும்.
- Pass-களில் synchronization conditions ஒரேபோல இருக்க வேண்டும்; இறுதியில் drawing-படி thread அளக்கவும்.
G76 automatic infeed பொருந்தினால் அதைத் தேர்வு செய்யலாம். G92 mill coordinate shift அல்ல; G76 போல K/D-இலிருந்து pass schedule கணக்கிடாது.
பாடம் 10 / TURNING
G94 · எளிய end-facing loop
Haas lathe · இந்த control-க்கான கற்றல் விளக்கம்
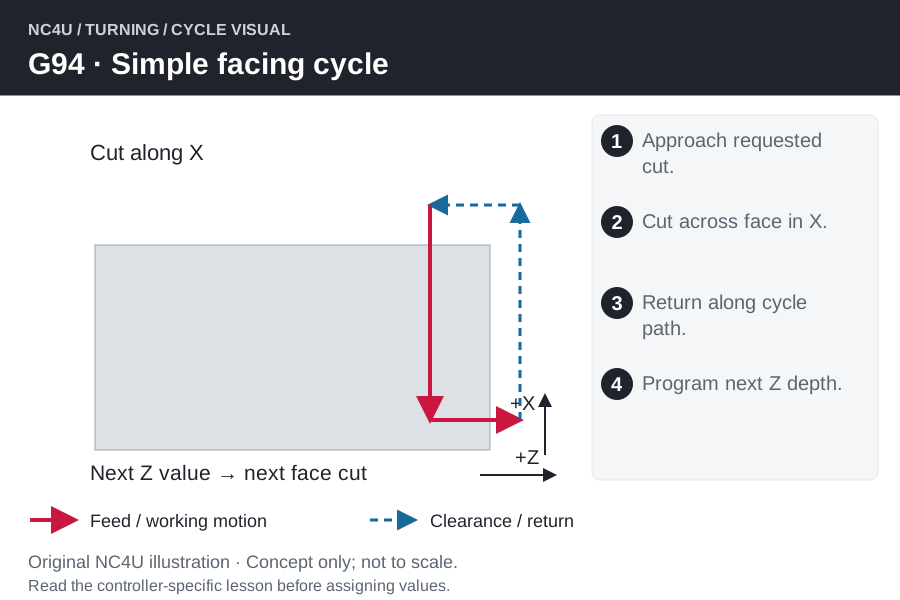
Haas lathe G94 facing cycle; mill feed-per-minute command அல்ல. Face-க்கு குறுக்கே வெட்டி திரும்பும்; அடுத்த Z depth-களை programmer கொடுக்க வேண்டும். Geometry/tool பொருந்தினால் conical face-க்கும் பயன்படுத்தலாம்.
Cycle இயங்கும் முறை
- Stock diameter-க்கு வெளியே front clearance-உடன் தொடங்கவும்.
- தேர்ந்த Z cutting level-ஐ அணுகும்.
- X endpoint நோக்கி face feed செய்து withdraw/return செய்யும்.
- அடுத்த Z depth கொடுக்கவும் அல்லது வெளியேறும் முன் motion mode மாற்றவும்.
Program words விளக்கம்
| Word | பொருள் |
|---|---|
X / Z | Face cut endpoint மற்றும் axial level. |
U / W | Incremental X/Z மாற்று; U diameter convention. |
K | விருப்ப Z திசை coning அளவு. |
F | Lathe G98/G99 அடிப்படையில் feed. |
Cycle format-ஐப் படியுங்கள்
இது placeholders கொண்ட syntax விளக்கம்; இயக்கக்கூடிய முழு program அல்ல.
G94 X[face-end] Z[face-level] F[feed]புரிந்துகொள்ள ஒரு உதாரணம்
Face Z0-இலிருந்து Z−2 mm செல்ல வேண்டுமெனில் −0.8, −1.6 மற்றும் final finish level என்று sketch செய்யலாம். உண்மையான levels stock நிலை மற்றும் finishing allowance-க்கு ஏற்ப மாறும்.
பொதுவான தவறுகள் மற்றும் setup சோதனைகள்
- Centre அருகே clearance, holder reach, CSS பயன்படுத்தினால் maximum rpm பார்க்கவும்.
- Recess wall simple return loop-ஐ மறைக்கிறதா சரிபார்க்கவும்.
G72 முழு profile-உடன் stock removal; G94 கொடுக்கப்பட்ட face levels-க்கான எளிய cycle. Lathe feed/min என்பது G98.
பாடம் 11 / TURNING
G32 · Synchronized thread-cutting move
Haas lathe · இந்த control-க்கான கற்றல் விளக்கம்
G32 முழு canned cycle அல்ல; axis travel-ஐ spindle rotation-உடன் இணைக்கும் synchronized move. Entry, withdrawal, return, அடுத்த pass அனைத்தையும் நீங்கள் எழுத வேண்டும். Cut முடிவில் automatic return இல்லை.

Cycle இயங்கும் முறை
- தேவையான constant rpm மற்றும் feed/revolution mode அமைக்கவும்.
- Known start மற்றும் required lead-உடன் threading move தொடங்கவும்.
- Thread path மற்றும் exit-ஐ வெளிப்படையாக எழுதவும்.
- வேறு Group 01 motion மூலம் G32 முடித்து return/next depth செய்யவும்.
Program words விளக்கம்
| Word | பொருள் |
|---|---|
X / Z | Thread move endpoint; குறைந்தது ஒரு axis move தேவை. |
F | Feed/revolution பொருளில் thread lead. |
Q | விருப்ப start angle; Haas-இல் degree-ன் ஆயிரத்தில் ஒரு பங்கு, decimal இல்லாமல். |
Cycle format-ஐப் படியுங்கள்
இது placeholders கொண்ட syntax விளக்கம்; இயக்கக்கூடிய முழு program அல்ல.
G32 Z[thread-end] F[lead]புரிந்துகொள்ள ஒரு உதாரணம்
Straight single-start 2 mm pitch thread-இல் ஒரு spindle revolution-க்கு Z travel 2 mm. 20 mm cut length geometry கணக்கில் பத்து revolutions; approach, acceleration, withdrawal தனியாக நேரம் எடுத்துக்கொள்ளும்.
பொதுவான தவறுகள் மற்றும் setup சோதனைகள்
- Haas-இல் feed override செயல்படாது; G32 sequence முடிவுவரை feed hold/single-block stop தாமதிக்கலாம்.
- Pass இடையில் actual rpm மாற்றக்கூடாது; Group 01 motion cancel-க்கு G80 மாற்று அல்ல.
G92 return loop சேர்க்கும்; G76 multiple passes-ஐயும் அமைக்கும். குறிப்பிட்ட thread path தேவைப்பட்டால் G32 பயன்படுத்தவும்.
பாடம் 12 / TURNING
G81 · ஒரே feed stroke axial drilling
Haas lathe · இந்த control-க்கான கற்றல் விளக்கம்
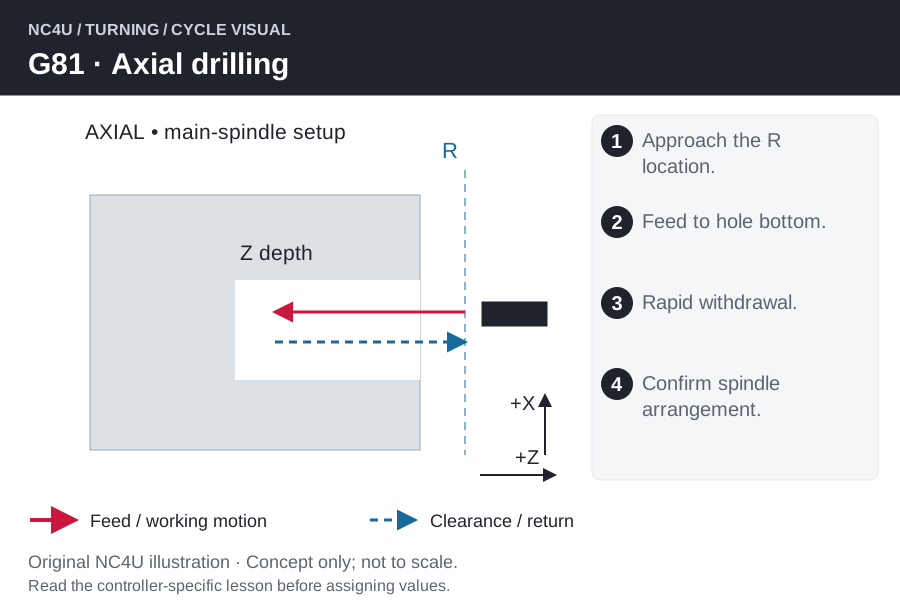
G81 axial hole-இல் ஒரே தொடர்ச்சியான feed stroke செய்து rapid withdraw செய்யும். On-centre stationary drill-க்கு work சுழலலாம்; off-centre face drilling-க்கு live tool மற்றும் positioning setup தேவை. Cycle பெயர் hardware-ஐத் தேர்வு செய்யாது.
Cycle இயங்கும் முறை
- On-centre axial அல்லது supported live-tool setup தேர்வு செய்து hole-க்கு clear ஆக position செய்யவும்.
- Tool/work offset உறுதிசெய்து R position அணுகவும்.
- R முதல் bottom Z வரை dwell/peck இல்லாமல் தொடர்ச்சியாக feed செய்யும்.
- Hole-இலிருந்து cycle return clearance வரை rapid retract செய்யும்.
Program words விளக்கம்
| Word | பொருள் |
|---|---|
R | உண்மையான face/clearance-க்கு ஏற்ப axial approach-plane position. |
Z | Axial bottom coordinate; tool-tip depth மற்றும் feature depth வேறு. |
F | Active lathe feed mode மற்றும் சுழலும் spindle-ஐ அறிந்து feed தேர்வு செய்யவும். |
Cycle format-ஐப் படியுங்கள்
இது placeholders கொண்ட syntax விளக்கம்; இயக்கக்கூடிய முழு program அல்ல.
G81 Z[bottom] R[approach] F[feed]புரிந்துகொள்ள ஒரு உதாரணம்
Face Z0, drill-tip endpoint Z−18 mm, R=Z+2 mm என்றால் R முதல் feed travel 20 mm. Drill-point geometry காரணமாக full-diameter hole depth, tip depth-ஐவிடக் குறையலாம்.
பொதுவான தவறுகள் மற்றும் setup சோதனைகள்
- ஆழமான hole அல்லது மோசமான chip flow-க்கு வேறு process தேவை; G81 chip-clearing peck செய்யாது.
- தொடர்பில்லாத positioning-க்கு முன் G80. Lathe G98/G99 feed units; milling return-plane commands அல்ல.
G82 bottom dwell சேர்க்கும்; G83 chip-clearing withdrawal சேர்க்கும். Code எண் வரிசையால் அல்ல, tool/chip நிலைக்கு ஏற்ப தேர்வு செய்யவும்.
பாடம் 13 / TURNING
G82 · Dwell உடன் axial spot drilling
Haas lathe · இந்த control-க்கான கற்றல் விளக்கம்
G82 axial depth வரை feed செய்து அங்கே dwell செய்து rapid-இல் திரும்பும். Spot/counterbore bottom-ஐ clean செய்ய pause உதவலாம்; dwell இருந்தாலே finish மேம்படும் என்று இல்லை. அதிக dwell heat/rubbing அதிகரிக்கலாம்.

Cycle இயங்கும் முறை
- On-centre axial அல்லது supported live-tool setup தேர்வு செய்து hole-க்கு clear ஆக position செய்யவும்.
- Tool/work offset உறுதிசெய்து R position அணுகவும்.
- R முதல் Z வரை feed செய்து P நேரம் அங்கே dwell செய்யும்.
- Dwell முடிந்ததும் clear return position-க்கு rapid withdraw செய்யும்.
Program words விளக்கம்
| Word | பொருள் |
|---|---|
R | உண்மையான face/clearance-க்கு ஏற்ப axial approach-plane position. |
Z | Axial bottom coordinate; tool-tip depth மற்றும் feature depth வேறு. |
F | Active lathe feed mode மற்றும் சுழலும் spindle-ஐ அறிந்து feed தேர்வு செய்யவும். |
P | Bottom dwell; control நேர அலகை உறுதி செய்யவும். |
Cycle format-ஐப் படியுங்கள்
இது placeholders கொண்ட syntax விளக்கம்; இயக்கக்கூடிய முழு program அல்ல.
G82 Z[bottom] R[approach] P[dwell] F[feed]புரிந்துகொள்ள ஒரு உதாரணம்
Ideal sharp-tip 90-degree spot tool-இல் 2 mm depth என்றால் 4 mm spot diameter. உண்மையான tool-இல் flat/radius இருக்கலாம்; actual geometry-க்கு ஏற்ப Z/diameter கணக்கிடவும்.
பொதுவான தவறுகள் மற்றும் setup சோதனைகள்
- P time units மற்றும் decimal விதி உறுதி செய்யவும். வேறு control-இன் P அதே நேரம் என்று கருத வேண்டாம்.
- தொடர்பில்லாத positioning-க்கு முன் G80. Lathe G98/G99 feed units; milling return-plane commands அல்ல.
G81 deliberate dwell இல்லை. G89 dwell செய்தாலும் boring return feed-இல்; G82 rapid-இல்.
பாடம் 14 / TURNING
G83 · Chip clearing உடன் axial peck drilling
Haas lathe · இந்த control-க்கான கற்றல் விளக்கம்
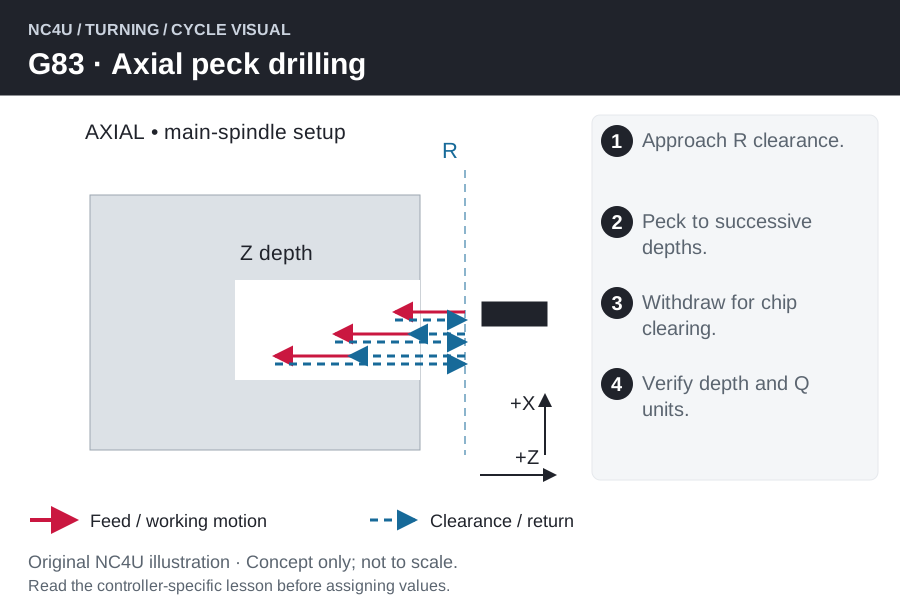
G83 ஆழமான axial drilling-ஐ successive peck depths-ஆகப் பிரித்து chips வெளியேற withdraw செய்யும். Drill geometry, coolant, peck size பொருந்த வேண்டும்; G83 தேர்வு மட்டும் எல்லா deep hole-க்கும் தீர்வு அல்ல.
Cycle இயங்கும் முறை
- On-centre axial அல்லது supported live-tool setup தேர்வு செய்து hole-க்கு clear ஆக position செய்யவும்.
- Tool/work offset உறுதிசெய்து R position அணுகவும்.
- அடுத்த peck depth வரை feed; chip clearing withdrawal; முந்தைய depth அருகில் மீண்டும் approach செய்து deeper feed செய்யும்.
- Final Z வரை தொடர்ந்து cycle return முடியும்; configured clearance-க்கு ஏற்ப retract distance மாறும்.
Program words விளக்கம்
| Word | பொருள் |
|---|---|
R | உண்மையான face/clearance-க்கு ஏற்ப axial approach-plane position. |
Z | Axial bottom coordinate; tool-tip depth மற்றும் feature depth வேறு. |
F | Active lathe feed mode மற்றும் சுழலும் spindle-ஐ அறிந்து feed தேர்வு செய்யவும். |
Q | Constant peck increment; absolute bottom coordinate அல்ல. |
I / J / K | மாற்று variable-peck mode: முதல் peck, குறைவு, minimum peck. |
Cycle format-ஐப் படியுங்கள்
இது placeholders கொண்ட syntax விளக்கம்; இயக்கக்கூடிய முழு program அல்ல.
G83 Z[bottom] R[approach] Q[peck] F[feed]புரிந்துகொள்ள ஒரு உதாரணம்
22 mm feed interval, Q=5 mm என்ற கணக்கில் increments 5, 5, 5, 5, 2 mm. இவை feed direction increments; எல்லாமே ஒரே final coordinate அல்ல.
பொதுவான தவறுகள் மற்றும் setup சோதனைகள்
- Constant Q அல்லது Haas I/J/K variable-peck ஒன்றை மட்டும் பயன்படுத்தவும். Setting52 clear move-ஐ R-க்கு அப்பால் நீட்டிக்கலாம்.
- தொடர்பில்லாத positioning-க்கு முன் G80. Lathe G98/G99 feed units; milling return-plane commands அல்ல.
G83-இல் chip clearing repeated sequence-இல் உள்ளது. Lathe G73 contour-repeat roughing; mill G73 drilling பொருளை இங்கு பயன்படுத்த வேண்டாம்.
பாடம் 15 / TURNING
G85 · Feed return உடன் axial boring
Haas lathe · இந்த control-க்கான கற்றல் விளக்கம்
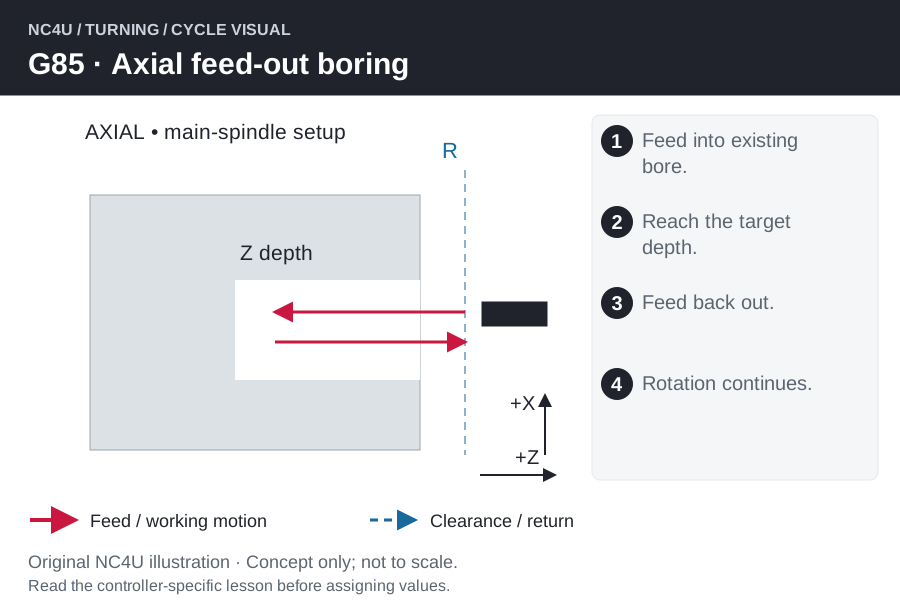
G85 axial bore-க்குள் feed செய்து rotation தொடரும்போது feed-இல் வெளியேறும். Controlled withdrawal தேவைப்படும் operation-க்கு பொருந்தும். Boring பொதுவாக existing hole-ஐ பெரிதாக்கும்; tool/shank-க்கு போதிய starting bore தேவை.
Cycle இயங்கும் முறை
- On-centre axial அல்லது supported live-tool setup தேர்வு செய்து hole-க்கு clear ஆக position செய்யவும்.
- Tool/work offset உறுதிசெய்து R position அணுகவும்.
- Approach plane முதல் final Z வரை தேர்ந்த feed-இல் செல்லும்.
- Rotation active-ஆக இருக்க axial travel-ஐ feed-இல் reverse செய்து clear இடத்தை அடையும்.
Program words விளக்கம்
| Word | பொருள் |
|---|---|
R | உண்மையான face/clearance-க்கு ஏற்ப axial approach-plane position. |
Z | Axial bottom coordinate; tool-tip depth மற்றும் feature depth வேறு. |
F | Active lathe feed mode மற்றும் சுழலும் spindle-ஐ அறிந்து feed தேர்வு செய்யவும். |
Cycle format-ஐப் படியுங்கள்
இது placeholders கொண்ட syntax விளக்கம்; இயக்கக்கூடிய முழு program அல்ல.
G85 Z[bottom] R[approach] F[feed]புரிந்துகொள்ள ஒரு உதாரணம்
Bore-க்குள் 15 mm entry மற்றும் 15 mm withdrawal என்றால் மொத்த feed travel 30 mm. 100 mm/min கணக்கு feed-இல் 18 seconds; approach/acceleration தனியாக. Feed-out rapid அல்ல.
பொதுவான தவறுகள் மற்றும் setup சோதனைகள்
- தேர்ந்த boring/reaming tool-க்கு feed withdrawal பொருந்துமா பார்க்கவும்; rubbing/recutting finish-ஐ பாதிக்கலாம்.
- தொடர்பில்லாத positioning-க்கு முன் G80. Lathe G98/G99 feed units; milling return-plane commands அல்ல.
G86 rotation நிறுத்தி rapid return. G89 feed-in/out உடன் dwell சேர்க்கும். இவற்றை ஒரே finishing strategy என்று மாற்றிப் பயன்படுத்த வேண்டாம்.
பாடம் 16 / TURNING
G86 · Spindle stop உடன் axial boring
Haas lathe · இந்த control-க்கான கற்றல் விளக்கம்
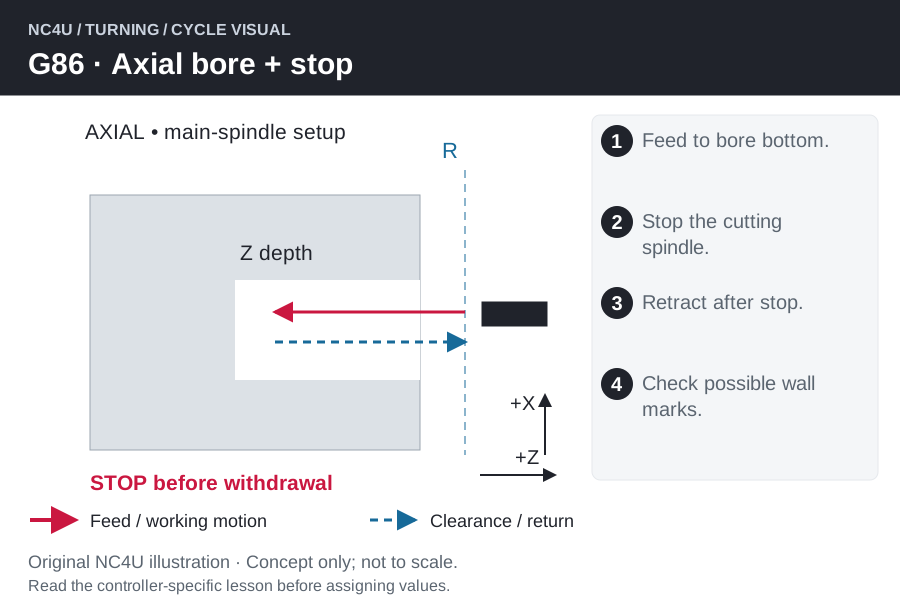
G86 bore-க்குள் feed செய்து கீழே spindle நிறுத்தும்; நின்றபின் retract செய்யும். Rapid return நேரம் குறைக்கலாம்; stationary cutting edge bore-இல் தடம் விடலாம். Tool/finish தேவைக்கு பொருந்த வேண்டும்.
Cycle இயங்கும் முறை
- On-centre axial அல்லது supported live-tool setup தேர்வு செய்து hole-க்கு clear ஆக position செய்யவும்.
- Tool/work offset உறுதிசெய்து R position அணுகவும்.
- Z endpoint வரை feed செய்து return-க்கு முன் spindle நிற்கும்.
- Spindle நின்றபின் bore-இலிருந்து rapid retract; அடுத்த cut-க்கு முன் spindle state பார்க்கவும்.
Program words விளக்கம்
| Word | பொருள் |
|---|---|
R | உண்மையான face/clearance-க்கு ஏற்ப axial approach-plane position. |
Z | Axial bottom coordinate; tool-tip depth மற்றும் feature depth வேறு. |
F | Active lathe feed mode மற்றும் சுழலும் spindle-ஐ அறிந்து feed தேர்வு செய்யவும். |
Cycle format-ஐப் படியுங்கள்
இது placeholders கொண்ட syntax விளக்கம்; இயக்கக்கூடிய முழு program அல்ல.
G86 Z[bottom] R[approach] F[feed]புரிந்துகொள்ள ஒரு உதாரணம்
Bore diameter சரியாக இருந்தாலும் withdrawal-க்குப் பின் axial scratch இருக்கலாம். Z depth மட்டும் மாற்றாமல் exit method, edge position, tool clearance பார்க்க வேண்டும்.
பொதுவான தவறுகள் மற்றும் setup சோதனைகள்
- Spindle stop என்பது orient + lateral clearance shift அல்ல. Fine-boring sequence என்று கருத வேண்டாம்.
- தொடர்பில்லாத positioning-க்கு முன் G80. Lathe G98/G99 feed units; milling return-plane commands அல்ல.
G85 rotation-உடன் feed return; G86 stop செய்து return. Radial live-tool bore-க்கு பொருந்தும் radial function தேவை.
பாடம் 17 / TURNING
G89 · Dwell மற்றும் feed return உடன் axial boring
Haas lathe · இந்த control-க்கான கற்றல் விளக்கம்
G89 axial bore-இல் feed entry, bottom dwell, feed withdrawal செய்கிறது. Shoulder அருகே controlled pause உதவலாம்; dwell duration-க்கு process காரணம் தேவை. Blunt tool, அதிக overhang, unstable holding-ஐ cycle சரிசெய்யாது.

Cycle இயங்கும் முறை
- On-centre axial அல்லது supported live-tool setup தேர்வு செய்து hole-க்கு clear ஆக position செய்யவும்.
- Tool/work offset உறுதிசெய்து R position அணுகவும்.
- Bottom வரை feed செய்து rotation-உடன் P dwell செய்யும்.
- Feed-இல் withdraw செய்து வேறு feature-க்கு முன் clear positioning இடத்தை அடையும்.
Program words விளக்கம்
| Word | பொருள் |
|---|---|
R | உண்மையான face/clearance-க்கு ஏற்ப axial approach-plane position. |
Z | Axial bottom coordinate; tool-tip depth மற்றும் feature depth வேறு. |
F | Active lathe feed mode மற்றும் சுழலும் spindle-ஐ அறிந்து feed தேர்வு செய்யவும். |
P | Bottom dwell; control நேர அலகை உறுதி செய்யவும். |
Cycle format-ஐப் படியுங்கள்
இது placeholders கொண்ட syntax விளக்கம்; இயக்கக்கூடிய முழு program அல்ல.
G89 Z[bottom] R[approach] P[dwell] F[feed]புரிந்துகொள்ள ஒரு உதாரணம்
ஒரு hole dwell 0.5 second என்றால் பன்னிரண்டு holes-க்கு dwell மட்டும் 6 seconds. Controlled trial-இல் finish ஒப்பிடவும்; பயன் இல்லாத dwell நேரத்தையும் rubbing-ஐயும் அதிகரிக்கலாம்.
பொதுவான தவறுகள் மற்றும் setup சோதனைகள்
- P time units மற்றும் boring bar bottom clearance உறுதி செய்யவும்; blind shoulder-இல் மோதக்கூடாது.
- தொடர்பில்லாத positioning-க்கு முன் G80. Lathe G98/G99 feed units; milling return-plane commands அல்ல.
G85 dwell இல்லாமல் செய்கிறது. G82 dwell இருந்தாலும் rapid return; அதே boring sequence அல்ல.
பாடம் 18 / TURNING
G84 · Axial வலது thread tapping
Haas lathe · இந்த control-க்கான கற்றல் விளக்கம்
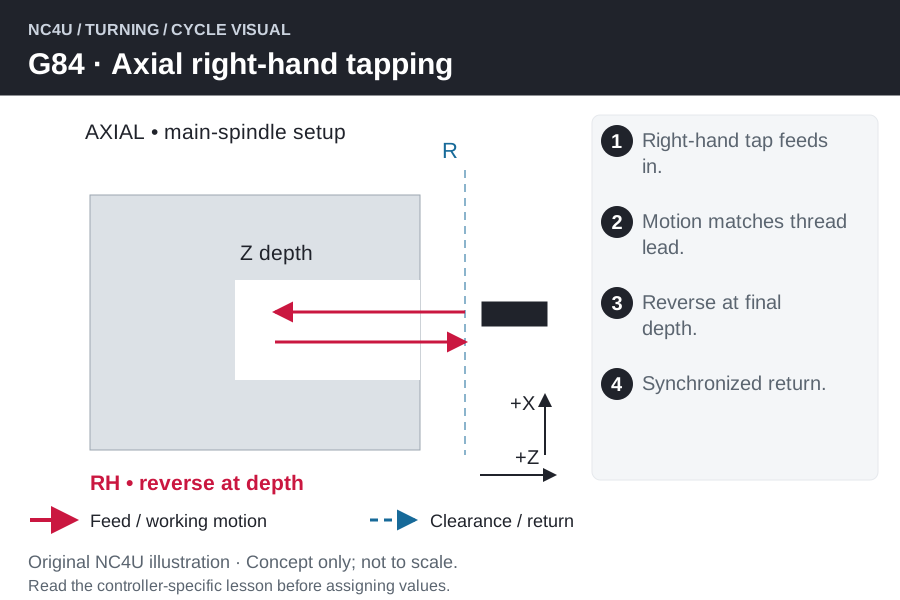
G84 axial travel-ஐ spindle rotation-உடன் இணைத்து வலது thread செய்கிறது. இது Haas lathe main-spindle tapping setup. Tap hand மற்றும் predrilled hole பொருந்த வேண்டும்; cycle tap-drill size அல்லது usable thread depth-ஐத் தேர்வு செய்யாது.
Cycle இயங்கும் முறை
- சரியான drilled hole, chamfer, tap/holder தயார் செய்யவும்.
- Cycle-க்கு முன் tapping rpm மற்றும் feed/revolution relation அமைக்கவும்.
- R அணுகி வலது thread-க்கான spindle direction-இல் Z வரை tap செல்லும்.
- அதே thread helix-இல் coordinated reverse செய்து withdraw; clear ஆனபின் வேறு movement-க்கு முன் cancel செய்யவும்.
Program words விளக்கம்
| Word | பொருள் |
|---|---|
S | இந்த Haas cycle-க்கு முன் tapping rpm கொடுக்க வேண்டும். |
F | G99-இல் F = revolution-க்கு thread lead. |
Z / R | Tap endpoint மற்றும் clear approach. |
Cycle format-ஐப் படியுங்கள்
இது placeholders கொண்ட syntax விளக்கம்; இயக்கக்கூடிய முழு program அல்ல.
G84 Z[tap-end] R[approach] F[lead-in-G99]புரிந்துகொள்ள ஒரு உதாரணம்
M8 × 1.25 single-start வலது thread-க்கு 1.25 mm/rev travel. 400 rpm என்றால் equivalent linear feed 500 mm/min. இது synchronization கணக்கு; blind hole-இல் usable thread-க்கு அப்பால் tap chamfer/chips இடமும் தேவை.
பொதுவான தவறுகள் மற்றும் setup சோதனைகள்
- Drilling feed-ஐ இங்கு பயன்படுத்த வேண்டாம்; tap lead movement ratio-ஐ நிர்ணயிக்கும்.
- Main-spindle, axial live-tool, radial live-tool tapping ஆகியவற்றுக்கு Haas functions வேறு.
G184 இடது thread மாற்று. G95 axial live-tool cycle; சரியான driven-tool setup தேவை.
பாடம் 19 / TURNING
G184 · Axial இடது thread tapping
Haas lathe · இந்த control-க்கான கற்றல் விளக்கம்
G184 axial travel-ஐ spindle rotation-உடன் இணைத்து இடது thread செய்கிறது. இது Haas lathe main-spindle tapping setup. Tap hand மற்றும் predrilled hole பொருந்த வேண்டும்; cycle tap-drill size அல்லது usable thread depth-ஐத் தேர்வு செய்யாது.

Cycle இயங்கும் முறை
- சரியான drilled hole, chamfer, tap/holder தயார் செய்யவும்.
- Cycle-க்கு முன் tapping rpm மற்றும் feed/revolution relation அமைக்கவும்.
- R அணுகி இடது thread-க்கான spindle direction-இல் Z வரை tap செல்லும்.
- அதே thread helix-இல் coordinated reverse செய்து withdraw; clear ஆனபின் வேறு movement-க்கு முன் cancel செய்யவும்.
Program words விளக்கம்
| Word | பொருள் |
|---|---|
S | இந்த Haas cycle-க்கு முன் tapping rpm கொடுக்க வேண்டும். |
F | G99-இல் F = revolution-க்கு thread lead. |
Z / R | Tap endpoint மற்றும் clear approach. |
Cycle format-ஐப் படியுங்கள்
இது placeholders கொண்ட syntax விளக்கம்; இயக்கக்கூடிய முழு program அல்ல.
G184 Z[tap-end] R[approach] F[lead-in-G99]புரிந்துகொள்ள ஒரு உதாரணம்
M8 × 1.25 single-start இடது thread-க்கு 1.25 mm/rev travel. 400 rpm என்றால் equivalent linear feed 500 mm/min. இது synchronization கணக்கு; blind hole-இல் usable thread-க்கு அப்பால் tap chamfer/chips இடமும் தேவை.
பொதுவான தவறுகள் மற்றும் setup சோதனைகள்
- Drilling feed-ஐ இங்கு பயன்படுத்த வேண்டாம்; tap lead movement ratio-ஐ நிர்ணயிக்கும்.
- Main-spindle, axial live-tool, radial live-tool tapping ஆகியவற்றுக்கு Haas functions வேறு.
G84 வலது thread மாற்று. G186 இடது axial live-tool cycle; அதே spindle setup அல்ல.
பாடம் 20 / TURNING
G95 · Live-tool face tapping: வலது
Haas lathe · இந்த control-க்கான கற்றல் விளக்கம்
G95 axial driven tap மூலம் Haas turning centre face hole-இல் thread செய்யும். Work hole position-இல் இருக்கும்; live tool tapping rotation வழங்கும். Main spindle சுழன்று stationary tap பயன்படுத்தும் centre-hole setup-இலிருந்து இது வேறு.

Cycle இயங்கும் முறை
- Supported X/Y/C மூலம் face hole position மற்றும் axial approach அமைக்கவும்.
- Cycle-க்கு முன் tapping rpm மற்றும் supported G99 feed/rev அமைக்கவும்.
- வலது thread-க்கு coordinated rotation-உடன் live tap Z-இல் செல்லும்.
- Synchronized reverse செய்து clear withdraw; அடுத்த hole index-க்கு முன் clearance பார்க்கவும்.
Program words விளக்கம்
| Word | பொருள் |
|---|---|
C / X / Y | Hole position: C angle; X machine diameter convention. |
Z / R | Axial tapping endpoint மற்றும் approach plane. |
S / F | முன் கொடுத்த rpm; G99-இல் lead-க்கு சமமான feed. |
Cycle format-ஐப் படியுங்கள்
இது placeholders கொண்ட syntax விளக்கம்; இயக்கக்கூடிய முழு program அல்ல.
G95 C[hole-angle] Z[tap-end] R[approach] F[lead]புரிந்துகொள்ள ஒரு உதாரணம்
நான்கு சம இடைவெளி face holes-க்கு 0°,90°,180°,270° index. 40 mm pitch-circle diameter என்றால் axis-இலிருந்து radius 20 mm. X diameter mode மற்றும் Y offset பார்க்காமல் X20 என்று கொடுக்க வேண்டாம்.
பொதுவான தவறுகள் மற்றும் setup சோதனைகள்
- Haas G95 documented X range machine zero முதல் main-spindle centre வரை; centre-ஐத் தாண்டக்கூடாது.
- Live-tool வசதி, thread hand, tap chamfer clearance உட்பட usable depth பார்க்கவும்.
G186 எதிர் thread hand. Radial live-tool holes-க்கு G195/G196. இங்கு G95 milling feed/rev அல்ல.
பாடம் 21 / TURNING
G186 · Live-tool face tapping: இடது
Haas lathe · இந்த control-க்கான கற்றல் விளக்கம்
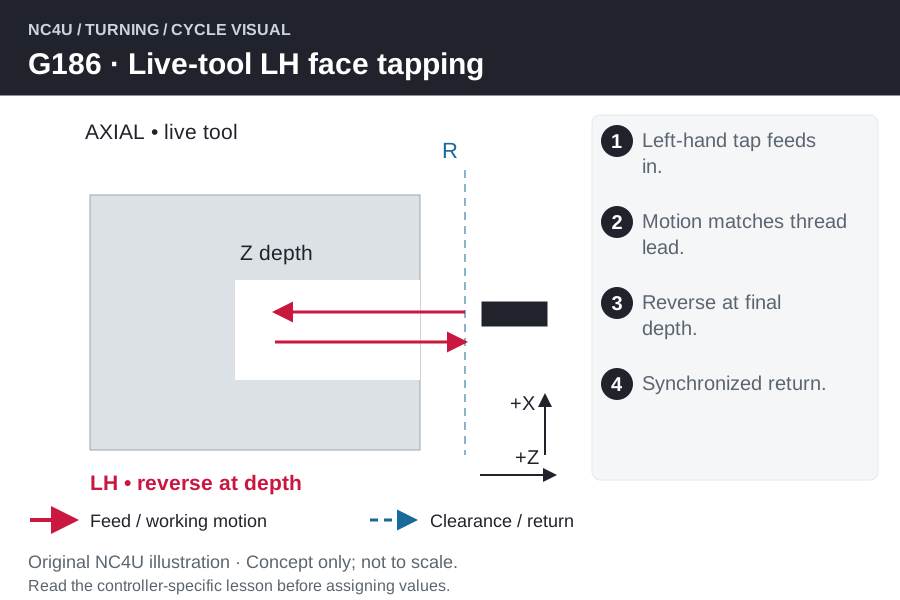
G186 axial driven tap மூலம் Haas turning centre face hole-இல் thread செய்யும். Work hole position-இல் இருக்கும்; live tool tapping rotation வழங்கும். Main spindle சுழன்று stationary tap பயன்படுத்தும் centre-hole setup-இலிருந்து இது வேறு.
Cycle இயங்கும் முறை
- Supported X/Y/C மூலம் face hole position மற்றும் axial approach அமைக்கவும்.
- Cycle-க்கு முன் tapping rpm மற்றும் supported G99 feed/rev அமைக்கவும்.
- இடது thread-க்கு coordinated rotation-உடன் live tap Z-இல் செல்லும்.
- Synchronized reverse செய்து clear withdraw; அடுத்த hole index-க்கு முன் clearance பார்க்கவும்.
Program words விளக்கம்
| Word | பொருள் |
|---|---|
C / X / Y | Hole position: C angle; X machine diameter convention. |
Z / R | Axial tapping endpoint மற்றும் approach plane. |
S / F | முன் கொடுத்த rpm; G99-இல் lead-க்கு சமமான feed. |
Cycle format-ஐப் படியுங்கள்
இது placeholders கொண்ட syntax விளக்கம்; இயக்கக்கூடிய முழு program அல்ல.
G186 C[hole-angle] Z[tap-end] R[approach] F[lead]புரிந்துகொள்ள ஒரு உதாரணம்
நான்கு சம இடைவெளி face holes-க்கு 0°,90°,180°,270° index. 40 mm pitch-circle diameter என்றால் axis-இலிருந்து radius 20 mm. X diameter mode மற்றும் Y offset பார்க்காமல் X20 என்று கொடுக்க வேண்டாம்.
பொதுவான தவறுகள் மற்றும் setup சோதனைகள்
- Haas G95 documented X range machine zero முதல் main-spindle centre வரை; centre-ஐத் தாண்டக்கூடாது.
- Live-tool வசதி, thread hand, tap chamfer clearance உட்பட usable depth பார்க்கவும்.
G95 எதிர் thread hand. Radial live-tool holes-க்கு G195/G196. இங்கு G95 milling feed/rev அல்ல.
பாடம் 22 / TURNING
G241 · Live-tool radial drilling
Haas lathe · இந்த control-க்கான கற்றல் விளக்கம்
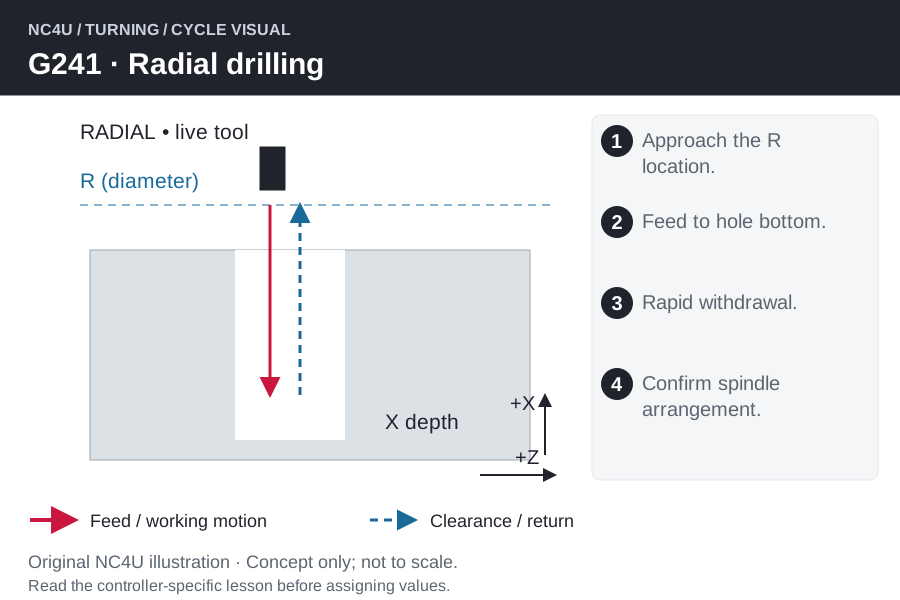
G241 radial live tool மூலம் turned component வெளியிலிருந்து centre நோக்கி drill செய்கிறது. Cut X திசையில்; Z component நீளத்தில் hole position; C angular position. End-face axial hole-இலிருந்து இது வேறு setup.
Cycle இயங்கும் முறை
- பொருத்தமான radial live tool, work/tool offsets அமைக்கவும்.
- Work-ஐ தேவையான C angle-இல் position/hold செய்து clear R மற்றும் live-spindle operation தேர்வு செய்யவும்.
- R approach diameter முதல் bottom diameter வரை X திசையில் inward feed.
- தொடர்ச்சியான drilling stroke-க்குப் பின் clear retract; deliberate peck/dwell இல்லை.
Program words விளக்கம்
| Word | பொருள் |
|---|---|
X / R | Radial cycle bottom/approach positions; diameter programming உறுதி செய்யவும். |
C / Z / Y | Angle மற்றும் longitudinal hole location; supported Y offset. |
F | Feed rate; Haas radial drilling/boring examples G98 feed/min பயன்படுத்துகின்றன. |
Cycle format-ஐப் படியுங்கள்
இது placeholders கொண்ட syntax விளக்கம்; இயக்கக்கூடிய முழு program அல்ல.
G241 X[bottom-diameter] R[approach-diameter] C[angle] Z[axial-location] F[feed]புரிந்துகொள்ள ஒரு உதாரணம்
50 mm OD part-இல் radial tip surface-க்கு கீழே 8 mm என்றால் diameter endpoint X34: 50−2×8. R diameter54 என்றால் physical radial clearance2 mm;4 mm அல்ல.
பொதுவான தவறுகள் மற்றும் setup சோதனைகள்
- Curved surface entry drill-ஐ விலக்கலாம். Entry preparation/tool geometry திட்டமிடவும்.
- தொடர்பில்லாத positioning-க்கு முன் G80; jaws/மற்ற features அருகே முழு holder envelope பார்க்கவும்.
G242 dwell; G243 chip-clearing pecks. Axial G81-இல் hole-depth direction Z.
பாடம் 23 / TURNING
G242 · Dwell உடன் radial spot drilling
Haas lathe · இந்த control-க்கான கற்றல் விளக்கம்
G242 radial drilling stroke-இல் bottom dwell சேர்க்கும். Live tool மூலம் circumference-இல் spot அல்லது பொருத்தமான counterbore செய்யலாம். Depth direction X; mill Z-depth உதாரணத்தை நேரடியாக நகலெடுக்கக்கூடாது.
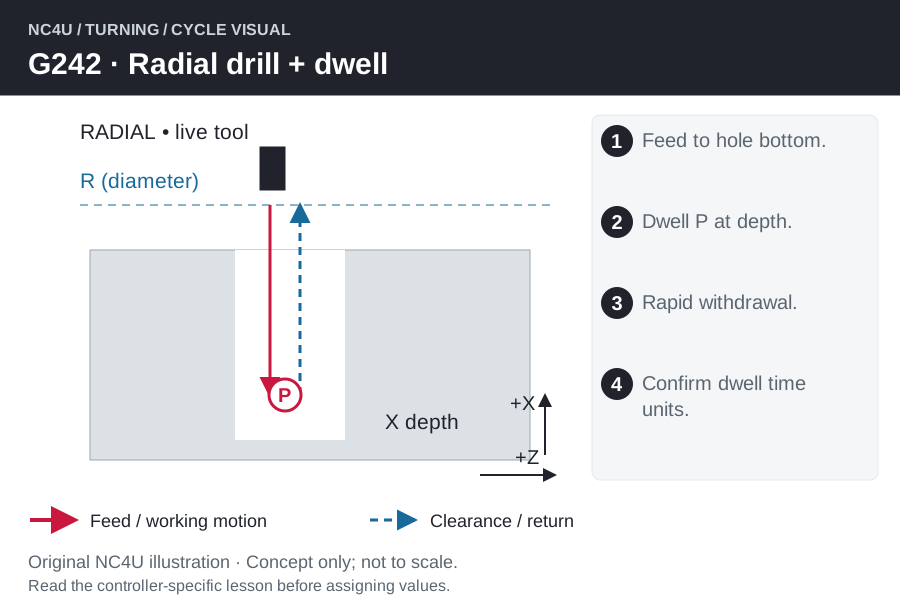
Cycle இயங்கும் முறை
- பொருத்தமான radial live tool, work/tool offsets அமைக்கவும்.
- Work-ஐ தேவையான C angle-இல் position/hold செய்து clear R மற்றும் live-spindle operation தேர்வு செய்யவும்.
- X திசையில் bottom diameter வரை feed செய்து P dwell செய்யும்.
- Dwell-க்குப் பின் rapid withdraw; angle/axial reposition-க்கு முன் radial clearance அடையவும்.
Program words விளக்கம்
| Word | பொருள் |
|---|---|
X / R | Radial cycle bottom/approach positions; diameter programming உறுதி செய்யவும். |
C / Z / Y | Angle மற்றும் longitudinal hole location; supported Y offset. |
F | Feed rate; Haas radial drilling/boring examples G98 feed/min பயன்படுத்துகின்றன. |
P | Bottom dwell; நேர input விதி உறுதி செய்யவும். |
Cycle format-ஐப் படியுங்கள்
இது placeholders கொண்ட syntax விளக்கம்; இயக்கக்கூடிய முழு program அல்ல.
G242 X[bottom-diameter] R[approach-diameter] C[angle] Z[axial-location] P[dwell] F[feed]புரிந்துகொள்ள ஒரு உதாரணம்
60 mm OD-இல் X60 முதல் X58 வரை சென்றால் radial penetration1 mm. Spot diameter tool angle/curved surface-ஐப் பொறுத்தது; X2 mm change என்பது hole depth2 mm அல்ல.
பொதுவான தவறுகள் மற்றும் setup சோதனைகள்
- இந்த block-இல் P dwell; peck depth/subprogram number அல்ல. Time unit உறுதி செய்யவும்.
- தொடர்பில்லாத positioning-க்கு முன் G80; jaws/மற்ற features அருகே முழு holder envelope பார்க்கவும்.
G241 dwell இல்லை. G242 cancel/replace வரை modal; தவறான அடுத்த Y/Z positioning operation-ஐ மீண்டும் செய்யலாம்.
பாடம் 24 / TURNING
G243 · Chip clearing உடன் radial peck drilling
Haas lathe · இந்த control-க்கான கற்றல் விளக்கம்
G243 radial hole-ஐ peck-களாக drill செய்து chips வெளியேற withdraw செய்கிறது. Work index position-இல் இருக்கும்; radial live tool சுழலும். Path-இல் entry, deeper cuts, clearance return அனைத்தும் உள்ளன.
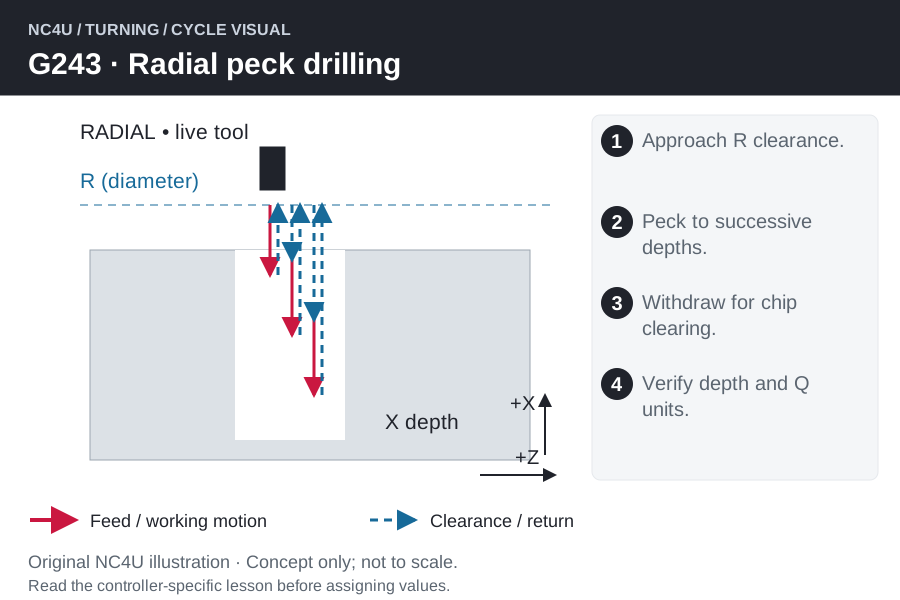
Cycle இயங்கும் முறை
- பொருத்தமான radial live tool, work/tool offsets அமைக்கவும்.
- Work-ஐ தேவையான C angle-இல் position/hold செய்து clear R மற்றும் live-spindle operation தேர்வு செய்யவும்.
- அடுத்த X increment feed செய்து chip clearing withdraw; மீண்டும் approach செய்து deeper cut.
- Bottom X வரை தொடர்ந்து அடுத்த hole positioning-க்கு clear return.
Program words விளக்கம்
| Word | பொருள் |
|---|---|
X / R | Radial cycle bottom/approach positions; diameter programming உறுதி செய்யவும். |
C / Z / Y | Angle மற்றும் longitudinal hole location; supported Y offset. |
F | Feed rate; Haas radial drilling/boring examples G98 feed/min பயன்படுத்துகின்றன. |
Q | Constant cut-in increment; endpoint X-இலிருந்து தனியாக unit பார்க்கவும். |
I / J / K | மாற்று: முதல் peck, ஒவ்வொரு peck குறைவு, minimum peck. |
Cycle format-ஐப் படியுங்கள்
இது placeholders கொண்ட syntax விளக்கம்; இயக்கக்கூடிய முழு program அல்ல.
G243 X[bottom-diameter] R[approach-diameter] C[angle] Z[axial-location] Q[peck] F[feed]புரிந்துகொள்ள ஒரு உதாரணம்
Diameter setup-இல் physical radial depth10 mm என்றால் X change20 mm. Endpoint conversion-ஐ peck argument unit-உடன் கலக்க வேண்டாம். Q அல்லது I/J/K control manual-இல் பார்க்கவும்; X diameter என்பதால் எல்லா values-ஐயும் இரட்டிப்பு/பாதியாக்க வேண்டாம்.
பொதுவான தவறுகள் மற்றும் setup சோதனைகள்
- Constant Q அல்லது I/J/K scheme ஒன்றைத் தேர்வு செய்யவும். Program retract இருந்தாலே chips வெளியேறிவிட்டது என்று இல்லை.
- தொடர்பில்லாத positioning-க்கு முன் G80; jaws/மற்ற features அருகே முழு holder envelope பார்க்கவும்.
G241 continuous feed; G243 cut/clearance repeat. Axial G83 போன்ற கருத்து; depth coordinates வேறு.
பாடம் 25 / TURNING
G245 · Feed return உடன் radial boring
Haas lathe · இந்த control-க்கான கற்றல் விளக்கம்
G245 driven boring tool மூலம் existing radial hole-ஐ bore செய்கிறது. Hole axial location Z; angle C; depth X. Controlled feed withdrawal என்பது rapid-out drilling-இலிருந்து வேறுபாடு.
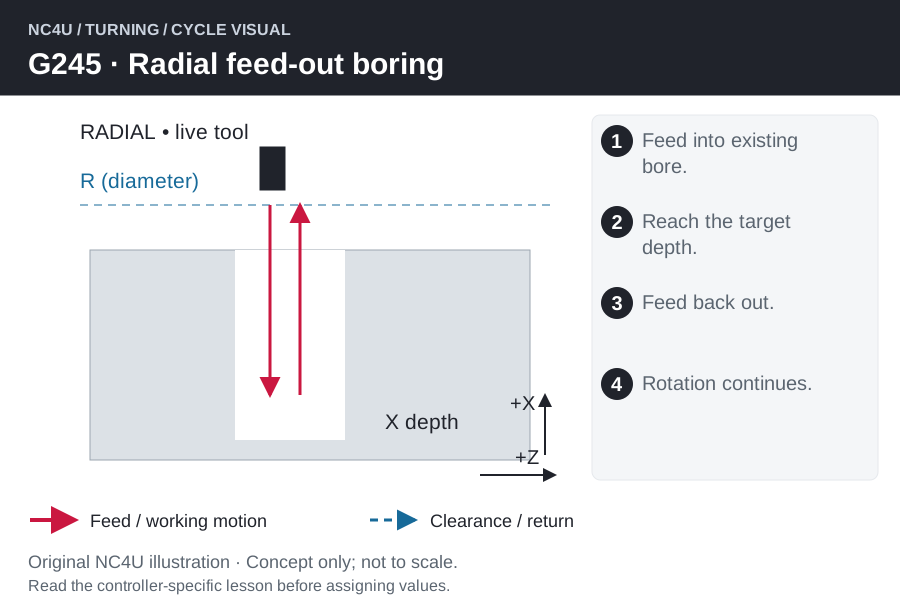
Cycle இயங்கும் முறை
- பொருத்தமான radial live tool, work/tool offsets அமைக்கவும்.
- Work-ஐ தேவையான C angle-இல் position/hold செய்து clear R மற்றும் live-spindle operation தேர்வு செய்யவும்.
- Radial clearance முதல் bottom X வரை boring tool inward feed செய்யும்.
- Rotation தொடரும்போது feed-இல் withdraw செய்து reposition-க்கு clearance அடையும்.
Program words விளக்கம்
| Word | பொருள் |
|---|---|
X / R | Radial cycle bottom/approach positions; diameter programming உறுதி செய்யவும். |
C / Z / Y | Angle மற்றும் longitudinal hole location; supported Y offset. |
F | Feed rate; Haas radial drilling/boring examples G98 feed/min பயன்படுத்துகின்றன. |
Cycle format-ஐப் படியுங்கள்
இது placeholders கொண்ட syntax விளக்கம்; இயக்கக்கூடிய முழு program அல்ல.
G245 X[bottom-diameter] R[approach-diameter] C[angle] Z[axial-location] F[feed]புரிந்துகொள்ள ஒரு உதாரணம்
50 mm OD shaft-இல் Z−25 mm bore என்றால் Z hole location; radial depth அல்ல. Bottom X30 என்றால் காட்டிய diameter mode-இல் surface-க்கு கீழே10 mm.
பொதுவான தவறுகள் மற்றும் setup சோதனைகள்
- Pilot-hole size, boring-head clearance, reach பார்க்கவும். Cutting tip bottom அடையும் முன்பே holder மோதலாம்.
- தொடர்பில்லாத positioning-க்கு முன் G80; jaws/மற்ற features அருகே முழு holder envelope பார்க்கவும்.
G246 rotation stop; G249 dwell. Tool/finish-க்கு பொருந்தும் exit தேர்வு செய்யவும்; boring என்ற பெயர் மட்டும் போதாது.
பாடம் 26 / TURNING
G246 · Spindle stop உடன் radial boring
Haas lathe · இந்த control-க்கான கற்றல் விளக்கம்
G246 radial bore-க்குள் feed செய்து bottom-இல் live spindle நிறுத்தி retract செய்கிறது. தேவையான hardware உள்ள Haas-க்கு இது radial boring function. Stopped exit witness line விடலாம்; surface finish தேவைக்கு பொருந்த வேண்டும்.

Cycle இயங்கும் முறை
- பொருத்தமான radial live tool, work/tool offsets அமைக்கவும்.
- Work-ஐ தேவையான C angle-இல் position/hold செய்து clear R மற்றும் live-spindle operation தேர்வு செய்யவும்.
- Programmed bottom வரை X feed செய்து tool rotation நிறுத்தும்.
- Spindle நின்றபின் retract; அடுத்த hole index-க்கு முன் clear position பெறவும்.
Program words விளக்கம்
| Word | பொருள் |
|---|---|
X / R | Radial cycle bottom/approach positions; diameter programming உறுதி செய்யவும். |
C / Z / Y | Angle மற்றும் longitudinal hole location; supported Y offset. |
F | Feed rate; Haas radial drilling/boring examples G98 feed/min பயன்படுத்துகின்றன. |
Cycle format-ஐப் படியுங்கள்
இது placeholders கொண்ட syntax விளக்கம்; இயக்கக்கூடிய முழு program அல்ல.
G246 X[bottom-diameter] R[approach-diameter] C[angle] Z[axial-location] F[feed]புரிந்துகொள்ள ஒரு உதாரணம்
Radial bore-இல் withdrawal திசையில் line இருந்தால் stopped cutting-edge contact/clearance பார்க்கவும். C position மாற்றுவது exit scratch-ஐ சரிசெய்யாது; C hole location, return sequence edge வெளியேறுவதை நிர்ணயிக்கும்.
பொதுவான தவறுகள் மற்றும் setup சோதனைகள்
- இது spindle orientation/lateral edge-clearance move தரும் என்று ஊகிக்க வேண்டாம். Actual sequence/tool geometry உறுதி செய்யவும்.
- தொடர்பில்லாத positioning-க்கு முன் G80; jaws/மற்ற features அருகே முழு holder envelope பார்க்கவும்.
G245 rotation-உடன் feed return; G246 stop செய்து return. G86 axial counterpart; depth direction வேறு.
பாடம் 27 / TURNING
G249 · Dwell உடன் radial boring
Haas lathe · இந்த control-க்கான கற்றல் விளக்கம்
G249 radial boring-இல் bottom dwell செய்து feed withdrawal செய்கிறது. Radial shoulder finishing-க்கு உதவலாம்; dwell tool/material-க்கு ஏற்றதாக வேண்டும். Oversized pilot hole அல்லது unstable boring tool-ஐ சரிசெய்யாது.
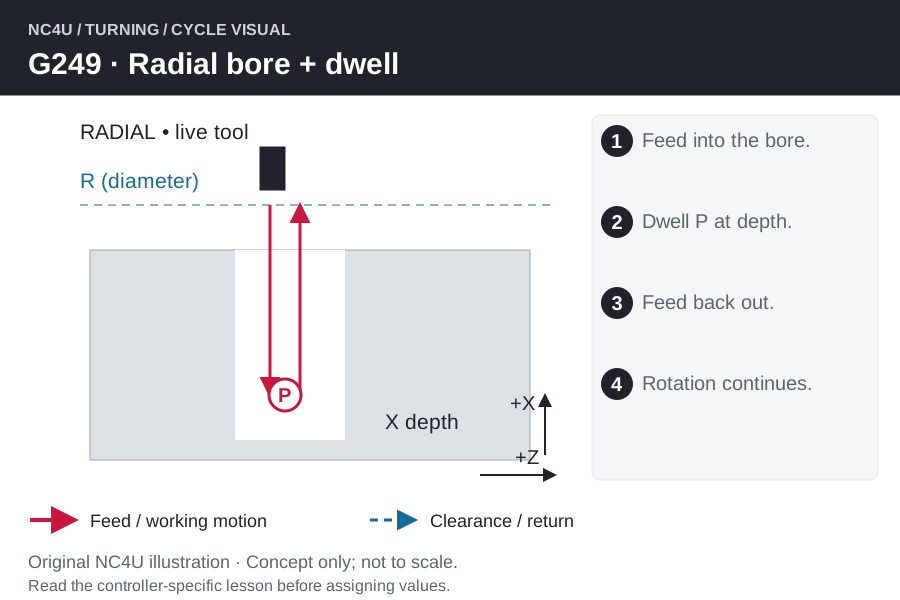
Cycle இயங்கும் முறை
- பொருத்தமான radial live tool, work/tool offsets அமைக்கவும்.
- Work-ஐ தேவையான C angle-இல் position/hold செய்து clear R மற்றும் live-spindle operation தேர்வு செய்யவும்.
- Driven boring tool X bottom வரை feed செய்து P நேரம் dwell செய்யும்.
- Dwell-க்குப் பின் feed withdrawal; அடுத்த index-க்கு முன் return path clear ஆக வேண்டும்.
Program words விளக்கம்
| Word | பொருள் |
|---|---|
X / R | Radial cycle bottom/approach positions; diameter programming உறுதி செய்யவும். |
C / Z / Y | Angle மற்றும் longitudinal hole location; supported Y offset. |
F | Feed rate; Haas radial drilling/boring examples G98 feed/min பயன்படுத்துகின்றன. |
P | Bottom dwell; நேர input விதி உறுதி செய்யவும். |
Cycle format-ஐப் படியுங்கள்
இது placeholders கொண்ட syntax விளக்கம்; இயக்கக்கூடிய முழு program அல்ல.
G249 X[bottom-diameter] R[approach-diameter] C[angle] Z[axial-location] P[dwell] F[feed]புரிந்துகொள்ள ஒரு உதாரணம்
எட்டு radial holes-இல் 0.25-second dwell என்றால் மொத்தம்2 seconds pause. Controlled trial-இல் shoulder finish பார்க்கவும். Ring/burn வந்தால் dwell அதிகரிப்பது tool/process பிரச்சினைக்கு தீர்வு அல்ல.
பொதுவான தவறுகள் மற்றும் setup சோதனைகள்
- இந்த control-இல் P modal; வேறு function-க்கு P பயன்படுத்துவது dwell-ஐ பாதிக்கலாம். சுற்றியுள்ள program-ஐயும் படிக்கவும்.
- தொடர்பில்லாத positioning-க்கு முன் G80; jaws/மற்ற features அருகே முழு holder envelope பார்க்கவும்.
G245 deliberate dwell இல்லை. G242 spot drilling dwell செய்தாலும் rapid return; இங்கு boring feed-out.
பாடம் 28 / TURNING
G195 · Radial live-tool tapping: Forward / வலது
Haas lathe · இந்த control-க்கான கற்றல் விளக்கம்
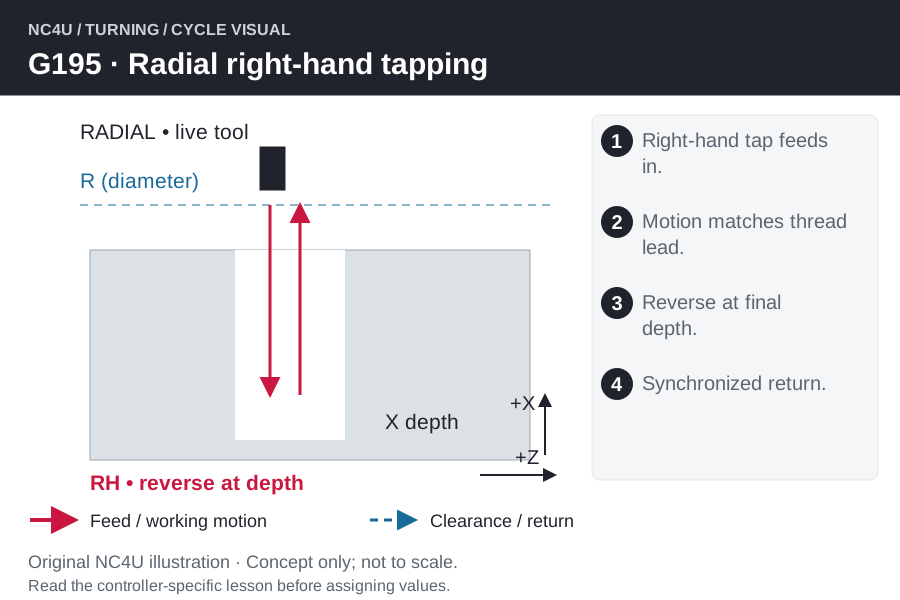
G195 circumference-இலிருந்து radial driven tool மூலம் synchronized X travel/rotation-உடன் tap செய்கிறது. Forward / வலது function-க்கு compatible live-tool setup தேவை. Ordinary turning போல work தொடர்ந்து சுழலாது; hole angle-இல் position செய்யப்படும்.
Cycle இயங்கும் முறை
- Radial pilot hole, tap hand, holder reach, entry chamfer உறுதி செய்யவும்.
- Part index, clearance அமைத்து cycle-க்கு முன் positive tapping rpm கொடுக்கவும்.
- G99 feed=thread lead என்ற நிலையில் X endpoint நோக்கி tap செல்லும்.
- Synchronized reverse செய்து thread வழியாக withdraw; தொடர்பில்லாத reposition-க்கு முன் modal cycle cancel செய்யவும்.
Program words விளக்கம்
| Word | பொருள் |
|---|---|
X / R | Radial bottom/approach; setup diameter interpretation பொருந்த வேண்டும். |
C / Z | Hole angle மற்றும் longitudinal position. |
S | Cycle-க்கு முன் positive tapping rpm. |
F | G99-இல் revolution-க்கு thread lead; diameter-coordinate difference அல்ல. |
Cycle format-ஐப் படியுங்கள்
இது placeholders கொண்ட syntax விளக்கம்; இயக்கக்கூடிய முழு program அல்ல.
G195 X[tap-end-diameter] R[approach] F[lead-in-G99]புரிந்துகொள்ள ஒரு உதாரணம்
1 mm lead tap-க்கு ஒரு tool revolution-இல் tap axis வழியாக1 mm physical motion தேவை. X endpoints diameter என்றாலும் lead இரட்டிப்பு அல்ல. 40 mm OD-இல் surface-க்கு கீழே6 mm endpoint, diameter mode-இல் X28.
பொதுவான தவறுகள் மற்றும் setup சோதனைகள்
- Blind radial hole-இல் tap chamfer/chips-க்கு internal bore/opposite wall-க்கு முன் இடம் தேவை.
- Supported synchronized tapping mode உறுதி செய்யவும்; சரியான lead-க்கு feed override மாற்று அல்ல.
G196 எதிர் thread-hand radial function. G95/G186 face holes-இல் Z tapping; G84/G184 main-spindle axial setup.
பாடம் 29 / TURNING
G196 · Radial live-tool tapping: Reverse / இடது
Haas lathe · இந்த control-க்கான கற்றல் விளக்கம்
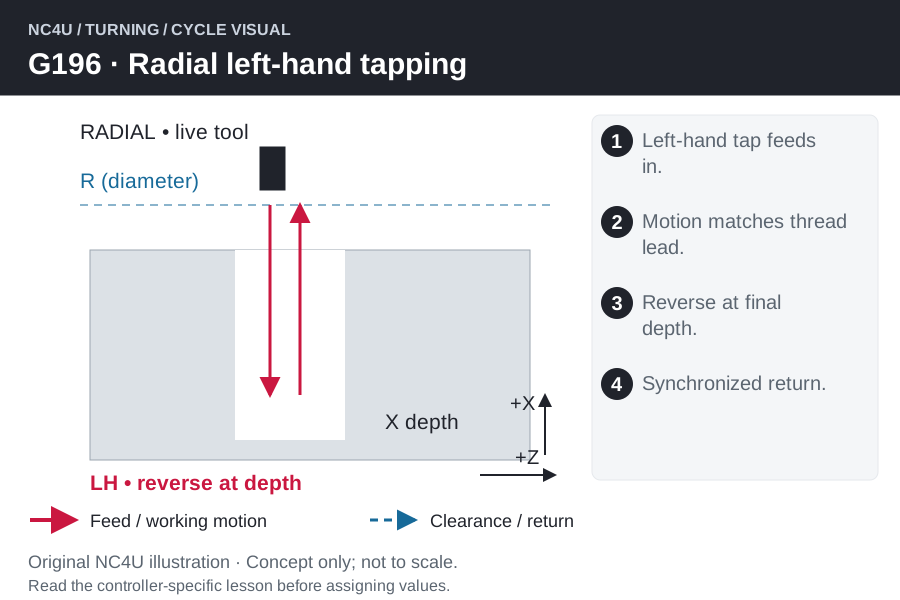
G196 circumference-இலிருந்து radial driven tool மூலம் synchronized X travel/rotation-உடன் tap செய்கிறது. Reverse / இடது function-க்கு compatible live-tool setup தேவை. Ordinary turning போல work தொடர்ந்து சுழலாது; hole angle-இல் position செய்யப்படும்.
Cycle இயங்கும் முறை
- Radial pilot hole, tap hand, holder reach, entry chamfer உறுதி செய்யவும்.
- Part index, clearance அமைத்து cycle-க்கு முன் positive tapping rpm கொடுக்கவும்.
- G99 feed=thread lead என்ற நிலையில் X endpoint நோக்கி tap செல்லும்.
- Synchronized reverse செய்து thread வழியாக withdraw; தொடர்பில்லாத reposition-க்கு முன் modal cycle cancel செய்யவும்.
Program words விளக்கம்
| Word | பொருள் |
|---|---|
X / R | Radial bottom/approach; setup diameter interpretation பொருந்த வேண்டும். |
C / Z | Hole angle மற்றும் longitudinal position. |
S | Cycle-க்கு முன் positive tapping rpm. |
F | G99-இல் revolution-க்கு thread lead; diameter-coordinate difference அல்ல. |
Cycle format-ஐப் படியுங்கள்
இது placeholders கொண்ட syntax விளக்கம்; இயக்கக்கூடிய முழு program அல்ல.
G196 X[tap-end-diameter] R[approach] F[lead-in-G99]புரிந்துகொள்ள ஒரு உதாரணம்
1 mm lead tap-க்கு ஒரு tool revolution-இல் tap axis வழியாக1 mm physical motion தேவை. X endpoints diameter என்றாலும் lead இரட்டிப்பு அல்ல. 40 mm OD-இல் surface-க்கு கீழே6 mm endpoint, diameter mode-இல் X28.
பொதுவான தவறுகள் மற்றும் setup சோதனைகள்
- Blind radial hole-இல் tap chamfer/chips-க்கு internal bore/opposite wall-க்கு முன் இடம் தேவை.
- Supported synchronized tapping mode உறுதி செய்யவும்; சரியான lead-க்கு feed override மாற்று அல்ல.
G195 எதிர் thread-hand radial function. G95/G186 face holes-இல் Z tapping; G84/G184 main-spindle axial setup.
NC4U விளக்கத்துடன் கற்றுக்கொள்ளுங்கள்
ஒரு component-இன் hole, pocket, groove அல்லது thread-இல் தொடங்குங்கள். Tool என்ன செய்ய வேண்டும் என்பதை அறிந்து, பொருத்தமான cycle தேர்வு செய்து, tool, offsets, clearance-ஐ சரிபார்க்கவும். எங்கள் படங்கள் கருத்தை விளக்குகின்றன; சரியான syntax-க்கு உங்கள் machine manual பொருந்தும்.
NC4U Solutions · சொந்த கற்றல் குறிப்புகள் மற்றும் விளக்கப்படங்கள் · விளக்கப்பட cycle பதிப்பு.
இந்த அறிவை நடைமுறை திறனாக மாற்றுங்கள்.
Coimbatore அல்லது Chennai-இல் NC4U மூலம் CNC setting, manual programming, Mastercam பயிலுங்கள். இந்தியா மற்றும் உலகின் எந்த இடத்திலிருந்தும் online பயிற்சி பெறலாம். உங்கள் அனுபவம் மற்றும் விருப்ப மொழியைப் பகிருங்கள்.