G81
Basic drilling
For a suitable shallow hole: position above the hole, approach R, feed to Z, then retract. Repeats at subsequent hole positions while active.
Check: Use G80 before unrelated positioning; check drill-point breakthrough allowance.
 NC4U SOLUTIONSPRACTICAL CNC LEARNING← Learning Hub
LEARNING HUB / CNC REFERENCE
Learn G81, G82, G83, G73, tapping, boring and pocket cycles with diagrams, applications and return-plane explanations for CNC milling.
Before using a code: this is a learning reference, not a machine-ready program. Verify the exact controller manual, setup, tools and offsets; simulate and complete a supervised prove-out.
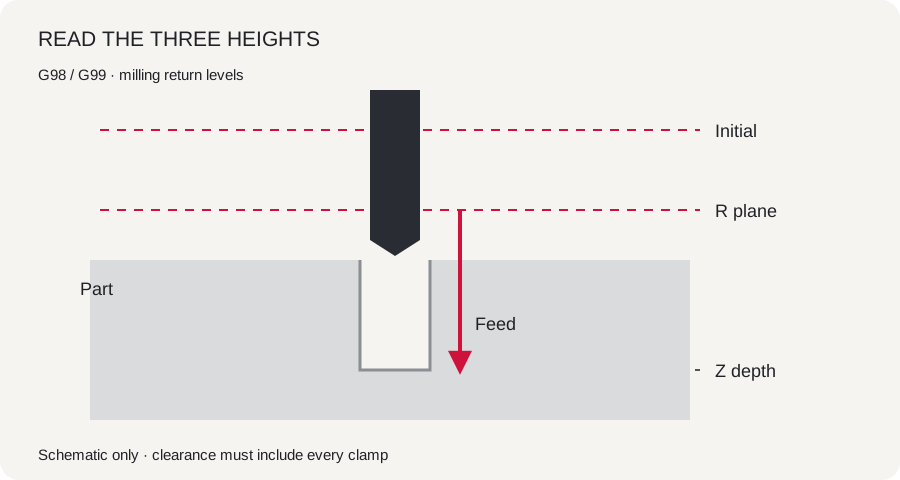
Select the plane and feed mode, establish the work and tool offsets, then choose R and Z from the actual setup. The initial level and R level are not automatically safe: include clamp height and any travel between holes.
G81
For a suitable shallow hole: position above the hole, approach R, feed to Z, then retract. Repeats at subsequent hole positions while active.
Check: Use G80 before unrelated positioning; check drill-point breakthrough allowance.
G82
A G81-style operation with a pause at the bottom, useful for an appropriate spot or counterbore operation.
Check: Excess dwell can rub or overheat the tool; confirm P time units.
G73
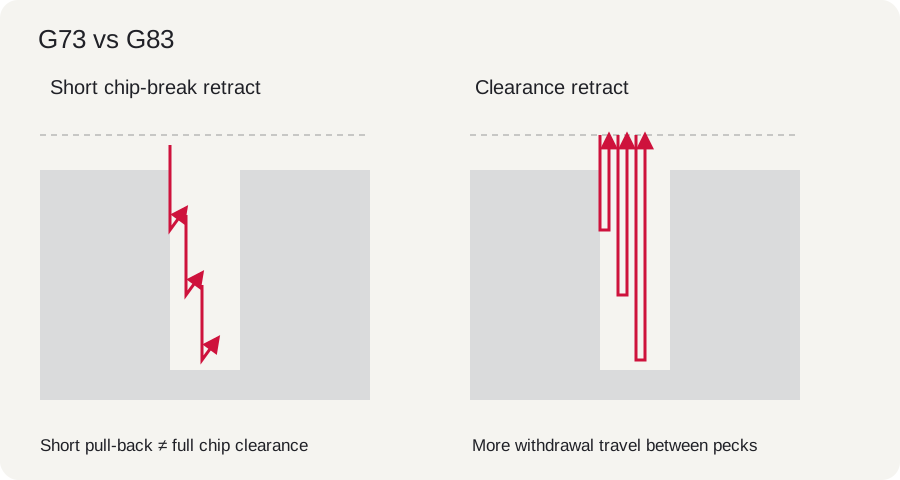
Make repeated pecks with a small pull-back to break chips; the tool does not fully clear the hole at every peck.
Check: Use only when chip evacuation is adequate. Retract amount can be a machine setting.
G83
Use successive depths with withdrawal to the clearance plane between pecks. Typical application: a deeper drilled hole that needs chip clearing.
Check: Choose Q peck depth for the process; on Haas do not combine Q with the I/J/K variable-peck method.
G84
Feed the tap in with spindle synchronisation, reverse at depth and withdraw on the matching lead.
Check: For a single-start metric thread in feed/min mode: feed = rpm × pitch. Rigid-tap preparation is control-specific.
G74
The reverse tapping cycle uses the spindle direction appropriate to a left-hand tap.
Check: Do not confuse it with lathe face grooving; verify the tap handedness.
G85
Feed to the bore depth, then withdraw at feed with the spindle running. Choose the cycle to suit the boring or reaming tool.
Check: Check tool-maker guidance; not every reamer should use the same withdrawal strategy.
G86
Feed into the bore, stop the spindle at depth, then withdraw rapidly on Haas.
Check: A stopped cutting edge can mark the wall; check the finishing requirement.
G89
Add a bottom dwell to a feed-in/feed-out boring sequence.
Check: Match dwell and feed to the tool; confirm the control's return behaviour.
G76
Bore to depth, orient the spindle and shift the cutting edge clear before withdrawal.
Check: The shift direction must agree with spindle orientation and boring-bar geometry.
G77
Clear the cutting edge, pass through the hole and machine a feature on the far side using a suitable back-boring tool.
Check: Verify entry clearance, far-side space and the full return path in simulation.
G80
End the active canned hole cycle before a different machining or positioning operation.
Check: Confirm the intended motion mode on the following block.
G98 / G99
Use initial-plane return to clear taller obstacles; use R-plane return when the travel path is clear at R height.
Check: The R level must clear the work and fixtures. These are milling meanings.
G12 / G13
Machine a circular pocket in clockwise or counterclockwise motion with the Haas circular-pocket feature.
Check: Check tool diameter, compensation register, entry and final radius in the Haas manual.
G150
Remove material inside a defined pocket boundary. The boundary subprogram and depth strategy define the operation.
Check: Verify island restrictions, contour syntax and tool entry for this control.
G70 / G71 / G72
Repeat a selected hole cycle at calculated positions around a circle, arc or angled line.
Check: These position patterns, not lathe roughing; check hole count and start angle.
G174 / G184
Optional non-vertical tapping functions for machines and configurations that support them.
Check: Do not substitute a normal Z tapping block; use the specific machine manual.
G156
A specialised broaching function for supported Haas configurations and suitable broaching tools.
Check: Confirm machine approval, orientation and tool/holder limits before process planning.
G83 X[hole-X] Y[hole-Y] Z[depth] R[clearance] Q[peck] F[feed]This is a labelled syntax sketch, not executable machine code. X/Y locate the hole; Z is the target depth; R is the approach plane; Q is the peck increment in this format; F follows the active feed mode. G90/G91 change how position words are interpreted. Confirm your control before making a program.
Worked feed example: a single-start M6 × 1 thread at 500 rpm needs 500 mm/min in feed-per-minute mode. In feed-per-revolution mode its feed is 1 mm/rev. These illustrate the relationship, not a recommended cutting speed.
Some other controls use G87/G88 for special boring functions. They are outside the Haas mill cycle scope of this guide. Their exact sequence depends on the controller; a gap between code numbers does not imply a missing universal function.
Start with a feature on a component: a hole, a pocket, a groove or a thread. Identify what the tool must do, choose a suitable cycle, then check the tool, offsets and clearance. Our diagrams explain the idea; the exact machine manual determines the supported syntax.
NC4U Solutions · Original learning notes and illustrations · Updated 9 November 2026.
Learn CNC setting, manual programming and Mastercam with NC4U in Coimbatore or Chennai, or join online from anywhere in India and worldwide. Discuss your current experience and preferred training language.